Last updated: May 25, 2026
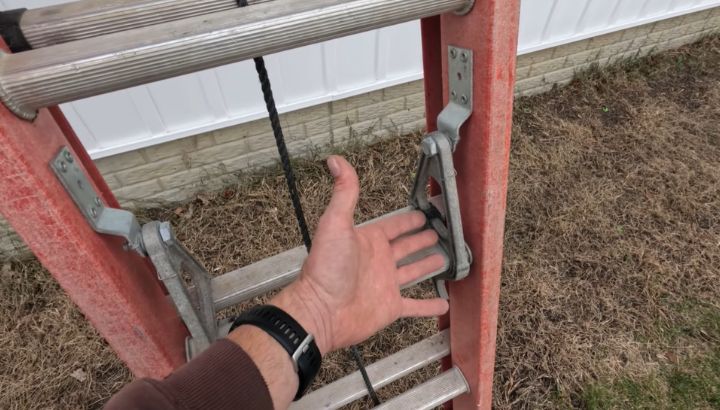
Use an extension ladder by laying it flat with the base against a wall, walking it up rung by rung from the top end, raising the fly section with the rope and pulley, locking the rung locks (pawls), positioning the base feet at a 4:1 ratio (1 foot out for every 4 feet of working height), and extending the top at least 3 feet above the contact point. Always face the ladder, maintain three points of contact, and never stand above the third rung from the top.
Why Is Using An Extension Ladder Different From A Step Ladder?
An extension ladder is different from a step ladder because it must lean against a vertical surface for support, has no self-supporting A-frame structure, and requires correct angle setup, base footing, and top contact to stay stable under load.
A step ladder is a self-supporting tool. You open it, lock the spreader bars, and it stands on its own. An extension ladder is the opposite. It is a long straight ladder with a sliding fly section, and it has zero stability until you lean it against something solid at the correct angle.
That dependency on a leaning surface is what makes extension ladders responsible for roughly 81% of all ladder-related ER visits per CPSC data, despite being only about 25% of ladders sold in the US. The math is simple. More variables in the setup means more ways to get it wrong.
I have set up extension ladders thousands of times across 16 years in the access and hauling industry. The ladder itself is straightforward once you understand the geometry: angle, height, base, top, and tie-off. Skip any one of those five and the ladder becomes a falling object with you on top of it.
The takeaway: extension ladders demand a deliberate setup sequence every single time, and there are no shortcuts that do not eventually put you on the ground.
How Do I Set Up An Extension Ladder Safely?
Set up an extension ladder by laying it flat with the base braced against a wall, walking the top end up rung by rung until vertical, raising the fly section with the rope until you reach the needed height, locking the rung locks fully, then walking the base out to a 4:1 angle.
The proper sequence prevents the most common setup injuries: dropped ladders, pinched fingers in the rung locks, and ladders falling sideways during the lift.
The fly section is the inner sliding portion of an extension ladder. It rides inside the base section on a track of guide brackets. The rope-and-pulley system raises the fly. The rung locks (also called pawls, dogs, or J-locks) clamp the fly to the base at fixed intervals, typically every 12 inches.
A 28-foot Werner D6228-2 fiberglass extension ladder weighs 49 lbs and has a closed length of 16 feet. Setting it up solo is doable but easier with two people, especially above the 24-foot size. A 40-foot Type IA aluminum ladder weighs around 75 lbs and should never be set up solo.
The single most overlooked step is the rung-lock check after raising the fly. The pawls must visibly engage the rung on both rails. A partially engaged lock will hold the ladder up while you climb, then release under load and drop the fly section several feet. I have seen this happen on a Louisville FE3220 where the painter ended up on the deck with a broken wrist.
The takeaway: every extension ladder setup is a 5-step sequence (lay, walk, raise, lock, position) with no permitted shortcuts.
What Is The Correct Angle For An Extension Ladder?
The correct angle for an extension ladder is 75.5 degrees from the ground, which works out to the 4:1 ratio: for every 4 feet of vertical height to the contact point, the ladder base should sit 1 foot out from the wall. A 16-foot working height puts the feet 4 feet from the building.
The 4:1 rule is OSHA standard 1926.1053(b)(5)(i) for construction work and ANSI A14 for ladder safety. The angle balances two competing failure modes.
Too steep (ladder closer to vertical, base less than 1:4 out) and the ladder tips backward when you lean away from it during work. Too shallow (base more than 1:4 out) and the ladder slides forward at the base, especially on smooth surfaces like concrete, wet grass, or polished tile floors.
The fastest field check is the “stand and reach” test. Stand at the base of the ladder with your toes touching the bottom of the side rails. Hold your arms straight out at shoulder height. If your palms touch the rungs at chest level without leaning forward or back, the angle is correct.
A smartphone app like Werner’s Ready Reach Calculator or any free inclinometer app can verify the 75.5-degree angle if you are unsure. I keep a small bubble-level inclinometer in my truck for fast checks on tall ladder setups.
For ladders used as roof access, the contact point must extend at least 3 feet (3 rungs) above the eave per OSHA 1926.1053(b)(1). The 4:1 ratio applies from the ground to that contact point, not just to the gutter line.
Bottom line: 4:1 angle, every time, verified by the stand-and-reach test or an inclinometer.
How To Use An Extension Ladder (Step By Step)
Inspect the ladder, lay it flat with base against a wall, walk it up vertically, raise the fly section with the rope, lock the pawls on both rails, walk the base out to 4:1 angle, secure the top with a rope tie-off, then climb slowly facing the ladder with three points of contact.
The full setup sequence that prevents the common failure modes:
Step 1: Inspect The Ladder Before Use
Check the side rails for dents, cracks, or impact damage. Check each rung for tightness in the rail (no spinning, no play). Inspect the rope and pulley for fraying or worn pulley sheaves. Check the rung locks (pawls) for free movement and full engagement. Check the foot pads for wear or missing rubber. Any cracked rail or missing rubber foot pad means the ladder is out of service until repaired or replaced.
Step 2: Check The Setup Area
Clear the area at the base and the top of the ladder. Look up for power lines, service drops, tree branches, or overhead obstructions. Aluminum ladders conduct electricity. OSHA requires 10 feet of clearance from any energized line under 50 kV per 1926.1408. For roof or upper window work near service drops, use a fiberglass ladder only.
Step 3: Lay The Ladder Flat And Brace The Base
Lay the closed extension ladder flat on the ground perpendicular to the wall it will lean against. Position the base feet directly against the base of the wall. The wall will brace the feet during the walk-up phase. Without the wall brace, the ladder feet will slide forward and the ladder will fall flat instead of standing up.
Step 4: Walk The Ladder Up Rung By Rung
Stand at the top end of the laid-flat ladder. Lift the top rung overhead and walk forward, hand over hand grabbing each successive rung as you advance toward the wall. The ladder pivots up at the base feet. Keep your back straight and use your legs, not your back. A 28-foot ladder weighs roughly 50 lbs but feels like much more during the lift because of leverage.
Step 5: Raise The Fly Section With The Rope
Once the ladder is vertical against the wall, walk to the base. Pull the rope hand-over-hand to raise the fly section to the needed height. Watch the rung locks (pawls) as you raise the fly. The locks ride free during the raise and snap onto a rung when you stop pulling.
Step 6: Lock The Pawls Fully
Lower the fly section slightly until the pawls catch a rung on both side rails. Verify visually that both locks are fully seated around the rung, not balanced on the rung edge. A partially seated pawl will release under load. This step is non-negotiable.
Step 7: Walk The Base Out To The 4:1 Angle
With the ladder upright and the fly locked, lift the base feet and walk them out from the wall. Use the 4:1 ratio: for every 4 feet of vertical height to the contact point, the base sits 1 foot out. A 20-foot working height puts the base 5 feet from the wall. Verify with the stand-and-reach test.
Step 8: Level The Base Feet
The ground under the base feet must be solid and level. If one foot sits higher than the other (uneven ground, sloping driveway, gravel), use a ladder leveler accessory like the Werner PK80-2 or a stabilizing leg attachment. Never shim a ladder foot with bricks, scrap wood, or rocks.
Step 9: Secure The Top Of The Ladder
For any work above 10 feet, tie off the top of the ladder to a structural anchor with a 5/16-inch nylon rope or a ratchet strap. A bowline knot or two half-hitches around the top rung and around a structural eye bolt, chimney strap, or other rated anchor takes 30 seconds and prevents lateral kick-out.
Step 10: Climb With Three Points Of Contact
Always maintain three points of contact: two hands and one foot, or two feet and one hand. Face the ladder. Climb steadily without skipping rungs. Carry tools in a tool belt or hoist them up with a rope after positioning. Never carry tools in your hand during the climb.
What this means: a deliberate 5-minute setup is the price of staying off your back for the rest of your career.
How High Can I Climb On An Extension Ladder?
You can climb safely up to the fourth rung from the top of an extension ladder, but never stand on or above the third rung from the top. The top three rungs are not standing surfaces under ANSI A14 ladder safety standards.
The working height of an extension ladder is always less than the total extended length. There are three reasons.
First, the overlap between the base and fly sections eats 3 to 6 feet of length depending on ladder size. Ladders up to 32 feet require 3 feet of overlap. Ladders 36 to 40 feet require 4 feet. Ladders 44 to 48 feet require 5 feet. A 28-foot extension ladder has a maximum extended length of 25 feet because of the required 3-foot overlap.
Second, the climber must stand below the top three rungs. That removes another 3 feet of usable height.
Third, if the ladder is used for roof access, the top must extend 3 feet above the eave for transition gripping. That moves the contact point 3 feet below the top of the ladder.
Practical working height calculation: a 24-foot extension ladder gives you about 18 feet of safe standing height. A 28-foot ladder gives you 21 feet. A 32-foot ladder gives you 25 feet. A 40-foot ladder gives you 31 feet.
The standing rungs are the lower portion of the fly section. Once you climb above where the base section ends, you are standing on the fly only. This is normal and rated for it. What is not rated is standing on the very top of the fly or on the top cap.
I have a habit of marking the “highest safe rung” on every extension ladder I own with a strip of red electrical tape during the inspection. It is a fast visual cue when you are mid-climb.
The takeaway: buy a ladder 4 to 6 feet longer than your maximum working height to account for overlap and safe-standing limits.
What Most Extension Ladder Guides Get Wrong
After 16 years in the access industry, here are the omissions that bother me most about typical extension ladder content.
The first is the silence on rope-and-pulley failure. The rope is the part that fails first on a ladder, usually because it gets pinched in the pulley or frays at the contact point. A frayed rope can snap during the fly raise, dropping the fly section onto the climber’s hands or feet. I replace ladder rope every 3 to 5 years on any ladder in regular use.
The second is the focus on angle without addressing base footing. A perfect 4:1 angle on a base that slides forward is still a falling ladder. The base must contact solid ground or a non-slip surface. On smooth concrete, on wet pavement, on grass that becomes mud, the base needs either rubber slip-resistant feet (standard on most ladders but worn out on many old ones) or a ladder mat like the Werner LP-2200 placed under each foot pad.
The third is the ignored topic of single-person versus two-person setup. A 40-foot Type IA ladder weighs 75 lbs and is 22 feet long when closed. Trying to walk it up solo is how most ladder-drop injuries happen. Any ladder above 32 feet should be set up with two people.
The fourth is the wrong assumption about ladder type rating. Type III household ladders (200-lb capacity) are sold at every big-box store. They are not adequate for a 190-lb adult plus a 10-lb tool belt plus 5 lbs of materials. Type IA (300 lbs) is the minimum for any professional or serious DIY work.
On a job in Aurora last spring, I watched a homeowner with a 24-foot Type III aluminum extension ladder attempt a chimney repair. He weighed 195 lbs. The bottom rung failed at the weld halfway through the descent. He landed on his hip, was off work for 11 weeks, and the hospital bill cleared $14,000. A proper Type IA fiberglass extension ladder costs $329.
The takeaway: ladder type rating, rope condition, base footing, and crew size are all setup factors most guides skip.
What Are The OSHA Rules For Extension Ladders?
OSHA 1926.1053 governs portable ladder use in construction, requiring extension ladders to be set at 4:1 angle (75.5 degrees), extended 3 feet above the contact point, used only on stable level surfaces, kept clear of energized lines, and inspected before each use.
The major OSHA requirements for extension ladder use:
OSHA 1926.1053(b)(5)(i) sets the 4:1 angle ratio as the required setup angle for any portable ladder used as a means of access.
OSHA 1926.1053(b)(1) requires the side rails of a ladder used for access to extend at least 3 feet above the upper landing surface, or where impractical, be secured at the top to a rigid support.
OSHA 1926.1053(b)(6) requires ladders to be used only on stable and level surfaces unless secured to prevent accidental movement.
OSHA 1926.1053(b)(7) requires ladders not be used on slippery surfaces unless secured or provided with slip-resistant feet.
OSHA 1926.1053(b)(15) requires ladders to be inspected for visible defects before each day’s use and after any incident that could affect safe use.
OSHA 1926.1408 requires a minimum clearance of 10 feet from any overhead power line rated up to 50 kV during ladder use.
OSHA 1926.501(b)(11) requires fall protection (personal fall arrest, safety net, or guardrail system) for any work performed on a steep roof with unprotected sides and edges 6 feet or more above lower levels.
ANSI A14 standards run parallel to OSHA requirements and govern manufacturer ladder ratings: Type IAA (375 lbs), Type IA (300 lbs), Type I (250 lbs), Type II (225 lbs), and Type III (200 lbs).
What this means: OSHA compliance is not optional on any job site, and most of the rules are simple physical setup standards that take seconds to follow.
Know More: How To Tie Off A Ladder For Safety In Easy Steps
Know More: Are Step Ladders Adjustable?
Frequently Asked Questions
How Long Should My Extension Ladder Be For Different Jobs?
For a single-story house roof eave (about 9 to 10 feet up), use a 20-foot extension ladder which gives 16 feet of usable height. For a two-story house roof eave (about 18 feet up), use a 28-foot extension ladder which gives 21 feet of usable height. For a three-story building or tall commercial work, a 32-foot or 40-foot ladder is appropriate.
The rule of thumb is to buy a ladder 4 to 6 feet longer than the highest point you need to reach. This accounts for the 3-foot overlap between fly and base sections, the 3-foot extension above the contact point, and the safe-standing height limit (no higher than the fourth rung from the top).
How Do I Carry An Extension Ladder Safely On A Truck Or Van?
Carry an extension ladder on a vehicle using a roof rack rated for the ladder weight (most professional racks handle 250 to 500 lbs), or a hitch-mounted ladder rack like the Kargo Master Pro III which holds ladders behind the vehicle without using the roof.
Secure the ladder with at least two ratchet straps or rated cargo ropes, never bungee cords alone. Tie down both ends and the middle to prevent sliding and bouncing. For ladders that extend beyond the vehicle by more than 4 feet, attach a red flag during the day and a red light at night per FMCSA 49 CFR 393.87 to comply with federal rear-overhang requirements.
Can I Use An Extension Ladder On Uneven Ground?
Yes, but only with a ladder leveler accessory attached to one side rail to compensate for the uneven base. The Werner PK80-2 quick-click stair leveler extends one leg 9 inches in 1-inch increments. The Louisville LP-2299-00 offers the same range with a different clamp design.
Both clamp permanently to one side rail and stay on the ladder between jobs. Never shim an extension ladder foot with scrap wood, bricks, or rocks. These materials shift and slide under load and provide unpredictable friction with the ladder foot pad. If the ground is too soft (mud, sand, deep gravel), place a 12-inch by 12-inch plywood board under each foot to distribute the load.
What Is The Difference Between Type IA, Type I, And Type II Extension Ladders?
Type IA extension ladders are rated for 300 lbs working load and built for heavy professional construction use. Type I ladders are rated 250 lbs for medium-duty industrial use. Type II ladders are rated 225 lbs for medium-duty commercial use. Type III ladders are rated 200 lbs for light-duty household use.
For any professional contractor, painter, roofer, or HVAC tech, Type IA is the minimum acceptable rating. The 300-lb working load accounts for the climber plus a tool belt plus carried materials. Type II and Type III ladders are not adequate for an adult worker carrying equipment and are responsible for a disproportionate share of ladder failures. Type IAA at 375 lbs is the rating for heavy industrial work.
How Often Should I Replace My Extension Ladder?
Inspect your extension ladder before every use and replace it immediately if you find cracked rails, bent rungs, missing rivets, frayed rope, damaged pawls (rung locks), missing foot pads, or any sign of impact damage from a fall or vehicle strike.
Even without damage, fiberglass ladders degrade from UV exposure over 10 to 15 years if stored outside. The fiberglass develops surface fuzz called bloom, and the structural resin weakens. Aluminum ladders last longer (25+ years with no impact damage) but are more vulnerable to bent rails from drops. Replace any ladder that has fallen from height, been hit by a vehicle, or shows visible structural damage. A new Type IA fiberglass extension costs $250 to $400 and is a routine business expense for any contractor.
Can I Use An Extension Ladder Indoors Or In A Stairwell?
Yes, but with limitations. An extension ladder used indoors needs the same 4:1 angle setup and stable base. Polished hardwood, tile, and concrete floors are slippery surfaces under OSHA 1926.1053(b)(7) and require either rubber slip-resistant feet (standard on most ladders) or a ladder mat under each foot.
For stairwell use, attach a ladder leveler like the Werner PK80-2 to the downhill side rail to compensate for the stair rise. The leveler extends 9 inches in 1-inch increments to match standard stair rise dimensions (7 to 7.75 inches). Never set an extension ladder with one foot on a stair tread and the other on the riser face. The riser provides no friction and zero leveling support.
The Bottom Line On How To Use An Extension Ladder
Using an extension ladder safely comes down to a deliberate 5-step setup sequence: lay the ladder flat with base braced against the wall, walk it up rung by rung, raise the fly section with the rope, lock the pawls fully, and walk the base out to the 4:1 angle. Add a tie-off at the top for any work above 10 feet and you have a setup that will not surprise you.
The equipment basics matter as much as the setup. Use a Type IA fiberglass extension ladder for any serious work. Add a ladder leveler accessory for uneven ground or stair use. Replace the rope every 3 to 5 years. Inspect the rails, rungs, pawls, and foot pads before every use. Buy a ladder 4 to 6 feet longer than your maximum working height to account for overlap and safe-standing limits.
The mistakes that put people on their backs are predictable. Wrong angle. No tie-off. Skipped pawl check. Foot on the riser face. Reaching past the rails. Top three rungs as a standing platform. Type III household ladder under a 195-lb adult. Every one of these is correctable in under 5 minutes of setup time.
The roof will still be there. The siding job will still be there. The gutter cleanout will still be there. Take the 5 minutes to set up the extension ladder right, climb facing the rungs with three points of contact, and reverse the process exactly for the descent. That is how you use an extension ladder and come down the same way you went up.