Last updated: May 25, 2026
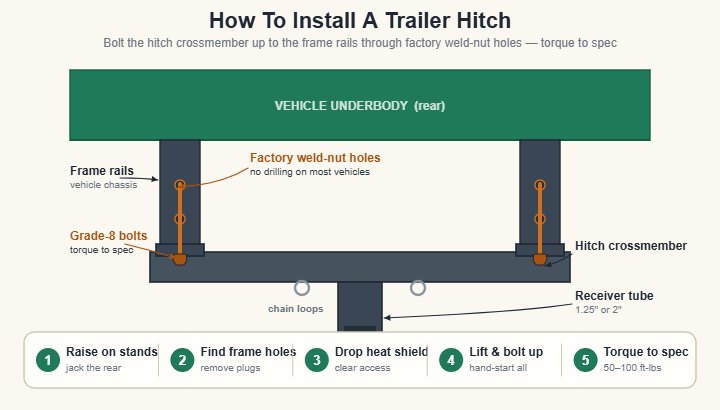
To install a trailer hitch, raise the rear of the vehicle on jack stands, locate the factory frame mounting points, lift the hitch into position with a transmission jack or helper, bolt the hitch to the frame with the supplied hardware, and torque the bolts to manufacturer spec (typically 50-100 ft-lbs).
The full DIY install takes 1 to 2 hours on most modern SUVs, crossovers, and pickups with factory bolt-on provisions. No drilling, welding, or cutting is required on vehicles built after 2005 because automakers pre-drill the frame for aftermarket hitch installation.
Curt, Reese Towpower, and Draw-Tite all use the same factory bolt-on approach, making this one of the most accessible DIY automotive jobs available. To install a trailer hitch correctly, you need basic hand tools, a torque wrench, and a jack with jack stands.
What Is A Trailer Hitch And What Does It Do?
A trailer hitch is a steel mounting assembly that bolts or welds to the rear frame of a vehicle and provides a receiver tube for trailers, bike racks, ladder racks, cargo trays, and other hitch-mounted accessories. The receiver tube measures 1.25 inches or 2 inches across the opening and accepts a matching shank with a hitch pin.
This article covers permanent trailer hitch receiver installation specifically, not gooseneck or fifth-wheel hitches, weight-distribution hitches, or pintle hitches. Each of those is a separate category with different installation requirements and intended use cases.
Trailer hitches fall under the broader category of vehicle towing equipment regulated by SAE J684 hitch class standards. The class rating (I through V) determines what tongue weight and gross trailer weight the hitch can safely carry. Hitch ladder racks, bike racks, and cargo carriers all require a compatible receiver class.
The five trailer hitch classes break down by capacity:
Class I (1.25-inch opening) caps at 200 lbs tongue weight and 2,000 lbs gross trailer weight. Common on compact sedans and subcompact crossovers.
Class II (1.25-inch opening, higher rated) caps at 350 lbs tongue weight and 3,500 lbs gross trailer weight. Common on midsize sedans and small SUVs.
Class III (2-inch opening) caps at 500-600 lbs tongue weight and 6,000-8,000 lbs gross trailer weight. The standard hitch class for SUVs, crossovers, and minivans.
Class IV (2-inch opening, heavy duty) caps at 800-1,200 lbs tongue weight and 10,000-14,000 lbs gross trailer weight. Standard on full-size pickups and large SUVs.
Class V (2.5-inch opening, heavy duty) caps at 1,200-2,700 lbs tongue weight and up to 20,000 lbs gross trailer weight. Standard on heavy-duty pickups and commercial vehicles.
For most aftermarket installations targeting bike racks, hitch ladder racks, or light cargo use, Class III is the right choice. It costs $20-$40 more than Class II and unlocks every common hitch accessory plus modest trailer towing capability.
On my own 2020 Ford F-250, the factory Class IV receiver was included as standard equipment. My wife’s 2019 Subaru Outback came with a factory Class III receiver. Most modern SUVs and pickups now include a hitch as standard or as a low-cost factory option ($300-$500 on the build sheet).
The takeaway: a trailer hitch is the structural foundation for every hitch-mounted accessory, and Class III is the recommended class for most aftermarket installs.
What Tools And Parts Do I Need To Install A Trailer Hitch?
You need the trailer hitch kit (Curt, Reese Towpower, Draw-Tite, or B&W), a torque wrench rated to 100 ft-lbs, a socket set with 17mm and 19mm sockets, a floor jack and 2 jack stands, a transmission jack or helper for hitch lifting, anti-seize compound, and basic hand tools (ratchet, breaker bar, pliers).
Here is the complete parts and tools reference for a typical Class III trailer hitch install:
| Item | Specification | Source | Cost |
|---|---|---|---|
| Trailer Hitch Kit (Class III) | Vehicle-specific bolt-on, hardware included | Curt, Reese, Draw-Tite, B&W | $180-$240 |
| Torque Wrench | 1/2-inch drive, 25-250 ft-lbs range | Harbor Freight, Sears, Amazon | $40-$120 |
| Socket Set | 17mm, 19mm, 21mm sockets, 1/2-inch drive | Craftsman, DeWalt, Husky | $30-$80 |
| Floor Jack | 2-ton minimum capacity | Harbor Freight, Pittsburgh | $50-$150 |
| Jack Stands (Pair) | 3-ton minimum capacity | Harbor Freight, Pittsburgh | $30-$80 |
| Transmission Jack (Optional) | Adjustable height, 500 lb capacity | Harbor Freight, Sunex | $80-$200 |
| Anti-Seize Compound | Copper or nickel-based | Permatex, Loctite | $8-$15 |
| Penetrating Oil | For factory bolt removal | PB Blaster, Liquid Wrench | $6-$10 |
| Hitch Pin and Clip | 5/8-inch diameter, included with hitch | Curt, Reese | Included |
| Trailer Wiring Kit (Optional) | 4-pin flat or 7-pin RV connector | Curt 56146, Reese 118395 | $30-$120 |
| Brake Controller (Optional) | Required for trailers with brakes | Tekonsha P3, Curt Echo | $80-$250 |
The hitch kit is the single largest expense. Curt makes vehicle-specific kits for nearly every car, truck, and SUV in the US market.
Reese Towpower and Draw-Tite offer comparable quality at similar pricing. B&W makes premium hitches with integrated locking systems for higher-end vehicles. All four brands meet SAE J684 hitch class standards and carry lifetime warranties on the steel structure.
The torque wrench is non-negotiable for any trailer hitch install. Hitch bolts must be torqued to manufacturer spec (typically 50-100 ft-lbs depending on bolt size). Under-torqued bolts loosen under vibration and the hitch sags or detaches. Over-torqued bolts stretch and lose clamping force. A $40 Harbor Freight Pittsburgh torque wrench is adequate for occasional DIY use.
The transmission jack is the optional tool that turns this from a 2-person job to a 1-person job. A typical Class III hitch weighs 30-50 lbs and requires holding in position while you start the bolts. A $99 Harbor Freight transmission jack lifts the hitch into position and holds it steady while you bolt it up.
The penetrating oil matters on older vehicles. Factory bolt threads in the frame can corrode after 5+ years of road salt exposure. A 24-hour soak with PB Blaster or Liquid Wrench prevents stripped bolts and broken sockets during removal.
On a 2018 Subaru Forester install I did for a client last spring, the factory frame plugs had never been removed. PB Blaster the night before, plus a 1/2-inch drive impact wrench on the morning of the install, dropped the removal time from 30 minutes to 5 minutes.
The takeaway: under $200 in tools plus $180-$240 for the hitch kit covers a complete DIY install with professional-grade equipment.
How To Install A Trailer Hitch (Step By Step)
Raise the rear of the vehicle on jack stands, locate the factory frame mounting points, remove any factory plugs or exhaust heat shields that block access, lift the hitch into position with a transmission jack or helper, install the hardware finger-tight, then torque to manufacturer spec in the specified sequence.
The complete install sequence that works on most modern bolt-on installations:
Step 1: Park On Level Ground And Engage The Parking Brake
Park the vehicle on a flat paved surface like a garage floor or concrete driveway. Engage the parking brake and chock the front wheels with wheel chocks or wood blocks. The vehicle must be completely stable before any jacking work begins. Block out a half-day for the install to avoid rushing critical steps.
Step 2: Raise The Rear Of The Vehicle
Use a floor jack at the rear differential or factory jack point to raise the rear of the vehicle. Place jack stands under the frame rails or factory lift points and lower the vehicle onto the stands. Verify stability by pushing firmly on the bumper before working underneath. Minimum clearance for hitch work is about 18 inches of ground-to-bumper height.
Step 3: Locate The Factory Frame Mounting Points
Slide under the vehicle and inspect the rear frame rails. Most modern vehicles have 2-4 factory bolt holes per side, often covered by removable plastic plugs or accessible from inside the frame rail.
Read the hitch installation manual to identify which holes match your specific receiver. The Curt and Reese installation guides include diagrams with bolt-hole locations for each vehicle make and model.
Step 4: Remove Factory Plugs Or Heat Shields
Remove any plastic plugs covering the factory bolt holes. Some vehicles require dropping the exhaust heat shield, the spare tire (on vehicles with a rear-mounted spare), or the rear bumper to access the mounting points.
Apply penetrating oil to factory threads that have not been disturbed since the vehicle was manufactured. Let the oil work for 5-10 minutes before attempting bolt installation. Tap each bolt hole with a thread chaser if you feel any roughness during the test thread.
Step 5: Lift The Hitch Into Position
Lift the hitch receiver into position against the rear frame. Use a transmission jack adjusted to the correct height, or have a helper hold the hitch while you start the bolts.
The receiver tube should face rearward and align centrally with the rear of the vehicle. Verify the hitch is level and the receiver opening sits between 13-18 inches off the ground for proper accessory ground clearance.
Step 6: Install The Hardware Finger-Tight
Insert the supplied bolts through the hitch mounting flanges and into the factory frame holes. Add a flat washer, lock washer, and nut to the inside of the frame rail.
Apply a small amount of anti-seize compound to the bolt threads before final installation. Hand-thread all bolts to finger-tight before applying any torque, which lets you align the hitch properly without binding the bolts.
Step 7: Verify Hitch Alignment
With all bolts finger-tight, step back and visually verify the hitch is centered and level. Adjust as needed by loosening individual bolts and shifting the hitch position. Misaligned hitches cause uneven tongue weight distribution and accelerated wear on the receiver tube.
Step 8: Torque The Bolts To Specification
Tighten each bolt to the manufacturer-specified torque value in the sequence specified in the install manual. Most Class III installations require 50-100 ft-lbs per bolt depending on bolt diameter (M10, M12, or M14).
Apply torque in a star or cross pattern to distribute clamping force evenly. Avoid tightening bolts to full torque in sequence around the perimeter, which can warp the hitch flanges.
Step 9: Reinstall Heat Shields And Components
Replace any exhaust heat shields, spare tire carriers, or bumper components removed during access. Verify all factory clips, brackets, and fasteners are reinstalled and tight.
Some hitches require trimming or modifying the rear bumper plastic to clear the receiver tube. Use a sharp utility knife or rotary tool for clean cuts, and seal cut edges with paint or rust inhibitor.
Step 10: Lower The Vehicle And Test The Installation
Remove the jack stands and lower the vehicle to the ground. Insert a standard 5/8-inch hitch pin through the receiver tube and verify smooth fit.
Test the installation by hanging a 50 lb weight from the receiver and checking for sag, flex, or rattle. The receiver should hold the load without any visible movement at the frame attachment points. Re-torque all bolts after 100 miles of driving to compensate for any settling.
What this means: a careful 1-2 hour install delivers a permanent hitch mounting point that will outlast the vehicle itself.
What Are The Main Mistakes To Avoid When Installing A Trailer Hitch?
The most common mistakes are skipping the torque wrench (under-torqued or over-torqued bolts), installing on rusted frame holes without penetrating oil (stripped threads), forgetting the heat shield drop on certain vehicles (blocked access), and choosing the wrong hitch class for future accessory upgrades.
The specific install mistakes I see most often fall into four categories.
Skipping the torque wrench is the single biggest mistake. Hitch bolts must be torqued to manufacturer spec for the receiver to perform safely. Under-torqued bolts loosen under vibration and the hitch sags.
Over-torqued bolts stretch and lose clamping force, then fail under load. A $40 torque wrench from Harbor Freight or Pittsburgh is adequate for this job. Buy one before you start the install.
Installing on rusted frame holes without penetrating oil leads to stripped threads. Vehicles from salt-belt states (Michigan, Ohio, Pennsylvania, upstate New York) develop frame corrosion that locks factory bolt holes.
Skipping the PB Blaster pre-soak causes about 30% of stripped threads on first attempts. Apply penetrating oil the night before the install, then run a 1/2-inch drive impact wrench on the bolts to break them loose.
Forgetting the heat shield drop on certain vehicles blocks access to the mounting holes. The Toyota RAV4, Honda CR-V, and Subaru Outback all require dropping a heat shield to access at least one mounting bolt.
The install manual specifies which heat shields need to come down. Skipping this step means the install will not complete and you will have to remove and restart with the heat shield dropped.
Choosing the wrong hitch class for future upgrades is the most expensive mistake. Buying a Class II 1.25-inch receiver because you only plan to carry 2 bikes today seems like a cost savings.
Two years later when you add an e-bike or want a 4-bike platform rack, you discover the Class II receiver cannot handle the load. The fix is buying and installing a new Class III receiver, which doubles your total cost. Buy Class III the first time for any bike rack use beyond the cheapest hanging models, or Class IV if you plan future trailer towing.
On a job in Boulder in 2022, a client installed a Class II 1.25-inch receiver to save $40 over the Class III 2-inch model. Six months later he bought a Kuat NV 2.0 4-bike platform rack with a 2-inch shank, which did not fit his receiver. He spent another $220 on a Class III receiver and 2 hours re-installing it.
The takeaway: torque wrench, penetrating oil, heat shield knowledge, and Class III sizing prevent the four most common install mistakes.
Do I Need To Install Trailer Wiring With My Hitch?
You do not need to install trailer wiring with your hitch if you only plan to use a bike rack, hitch ladder rack, or cargo carrier. Trailer wiring is required only for towing trailers with brake lights, turn signals, or electric brakes. A 4-pin flat connector handles basic trailer lighting, while a 7-pin RV connector adds brake controller and auxiliary power circuits.
The wiring decision depends entirely on your intended use.
Hitch-mounted accessories (bike racks, ladder racks, cargo trays) do not require trailer wiring because they are passive accessories with no electrical components. The receiver tube provides only the structural mounting point.
The exception is supplemental light kits for bike racks and cargo carriers that block the vehicle’s factory taillights or license plate. The Wesbar 54209-012 kit ($55) and Optronics MCL40RB kit ($45) wire to a 4-pin flat trailer connector to provide brake, turn signal, running light, and license plate illumination at the rear of the rack.
Trailers with brake lights and turn signals require a 4-pin flat connector. This is the standard for utility trailers, small boat trailers, and most lightweight trailers under 3,000 lbs. The Curt 56146 4-pin wiring kit ($30) installs in 1-2 hours using a T-connector that taps into the factory taillight harness without cutting wires.
Trailers with electric brakes require a 7-pin RV connector plus a brake controller. This is the standard for travel trailers, larger boat trailers, and any trailer with a gross weight over 3,000 lbs that uses electric brake assist.
A brake controller like the Tekonsha P3 ($150-$200) or the Curt Echo ($100) mounts under the dashboard or uses Bluetooth to communicate with the trailer brakes. The 7-pin connector kit and installation labor runs $200-$400 if done professionally.
For most aftermarket hitch installs targeting bike racks or hitch ladder racks, the wiring step is optional and can be added later if towing becomes a future need. Install the hitch first, add wiring only if and when you need it.
What this means: trailer wiring is only required for towing applications, not for hitch-mounted accessory use.
What I Wish I Knew Before My First Trailer Hitch Install
After 16 years installing trailer hitches and watching contractors and DIYers learn the hard way, here are the lessons I wish someone had given me before my first install in 2009.
The first lesson is that the install manual is non-negotiable. I tried to install my first Curt Class III receiver on a 2005 Toyota Tundra without reading the manual fully. I missed the heat shield drop step and spent 90 minutes trying to access a bolt hole that was blocked by the exhaust heat shield.
A 5-minute read of the install manual before starting would have saved me an hour and a half of frustration. Every brand-specific install manual lists the required modifications, the bolt torque values, and the access sequence. Read it twice before lifting a wrench.
The second lesson is that buying cheap tools costs more in the long run. I bought a $15 Harbor Freight torque wrench for my first install and it was already out of calibration on the second use.
A properly calibrated $40-$60 torque wrench from Harbor Freight Pittsburgh or Craftsman handles dozens of hitch installs without drift. The cheap version saves you $25 once and costs you a stripped bolt later.
The third lesson is that penetrating oil works overnight, not in 30 seconds. I tried to remove rusted factory frame plugs on a 2010 Ford Escape by spraying PB Blaster and immediately attempting removal. Two of the four plugs stripped because I rushed the chemistry.
Apply penetrating oil the night before the install, then again 30 minutes before you start. The oil needs time to creep into the threaded interface and break the rust bond.
The fourth lesson is that the receiver class matters more than the price. I installed a Class II receiver on my 2009 Toyota Tundra to save $40 over the Class III. Three years later I bought a hitch ladder rack with a 2-inch shank that did not fit my Class II 1.25-inch receiver. The replacement install cost more than the original savings.
The fifth lesson is that the torque sequence matters. I installed my first hitch by tightening each bolt to full torque in sequence around the perimeter, which warped the hitch mounting flange and created uneven contact with the frame. The correct approach is the star or cross pattern specified in the install manual.
The takeaway: read the manual, buy good tools, prep with penetrating oil, oversize the receiver class, and follow the torque sequence.
Frequently Asked Questions
How Long Does It Take To Install A Trailer Hitch?
A typical DIY trailer hitch install takes 1 to 2 hours on a modern vehicle with factory bolt-on provisions. First-time installers often take 2-3 hours including reading the manual and setting up tools. Professional installation at U-Haul, etrailer, or a local hitch shop runs 60-90 minutes plus paperwork.
The install time depends on three factors: the vehicle’s factory provisions (bolt-on vs welded), the condition of the frame holes (clean vs corroded), and any heat shield or bumper modifications required for access. Salt-belt vehicles with rusted frame bolts can add 30-60 minutes to the timeline. Always block out a half-day for the install to avoid rushing critical torque steps.
Can I Install A Trailer Hitch Myself Without A Lift?
Yes, you can install most trailer hitches yourself without a lift by using a floor jack and jack stands. Modern vehicles built after 2005 typically include factory bolt-on provisions that accept the hitch in 1-2 hours of garage time using basic hand tools, a torque wrench, and a jack with stands.
The exception is vehicles that require dropping the exhaust system, rear bumper, or other major components for hitch access. These installs benefit from a lift for safety and convenience but can still be done on jack stands by an experienced DIYer. If your install requires welding or major frame modifications, professional installation is the safer choice.
Does Installing A Trailer Hitch Void My Vehicle Warranty?
Installing a trailer hitch typically does not void your vehicle warranty on the engine, transmission, and major drivetrain components. The Magnuson-Moss Warranty Act prevents automakers from voiding the entire warranty due to an aftermarket accessory installation, as long as the accessory does not directly cause a covered failure.
The exception is damage to the rear frame, body, or factory components caused directly by the hitch installation. If the hitch installer cracks a frame weld or damages a bumper during the install, that specific damage may not be covered. Professional installation at a certified hitch shop provides workmanship warranty coverage that protects against this risk.
What Class Trailer Hitch Do I Need For A Bike Rack?
For most bike rack applications, a Class III 2-inch receiver is the recommended choice. Class III handles all 4-bike platform racks (Kuat NV 2.0, Thule T2 Pro XTR, 1Up USA Heavy Duty), e-bike racks like the Hollywood Sport Rider SE2, and most vertical mountain bike racks with tongue weight up to 500-600 lbs.
A Class I or II receiver works only for 1-2 bike hanging racks like the Allen Sports Deluxe and Thule Apex XT 2. For 6-bike vertical racks, heavy e-bikes, or any future trailer towing, a Class IV 2-inch receiver provides additional capacity. Always size up to the next class if your loaded rack weight is within 50 lbs of the receiver tongue weight rating.
How Much Does Professional Trailer Hitch Installation Cost?
Professional trailer hitch installation costs $100 to $400 in labor on top of the hitch kit price ($180-$300). Total turnkey cost runs $300 to $700 depending on the vehicle, hitch class, and installation complexity. U-Haul, etrailer, and local hitch shops are the main installation providers.
Bolt-on installations on modern vehicles with factory provisions run $100-$200 in labor. Welded installations on classic cars or vehicles without bolt-on provisions run $200-$400 in additional labor. Trailer wiring installation adds $80-$200 depending on the connector type (4-pin flat vs 7-pin RV). DIY installation drops the total cost to $200-$300 by skipping the professional labor.
Can I Install A Trailer Hitch On Any Car?
You can install a trailer hitch on most cars, SUVs, pickups, and crossovers built in the last 30 years, but some vehicles have lower tow ratings or no factory bolt-on provisions. Compact cars, subcompact crossovers, and many electric vehicles limit you to Class I receivers (200 lbs tongue weight) due to frame strength.
Some hybrid and electric vehicles have specific hitch options because the rear underbody differs from the gas equivalent. Verify your vehicle has an available hitch using the Curt, Reese Towpower, or Draw-Tite fitment guide before purchasing. Vehicles without aftermarket hitch options or with low towing capacities are better served by roof-mounted or trunk-mounted accessory options.
The Bottom Line On How To Install A Trailer Hitch
To install a trailer hitch, raise the rear of the vehicle on jack stands, bolt the Class III or IV receiver to the factory frame mounting points using the supplied hardware, and torque the bolts to manufacturer spec (typically 50-100 ft-lbs).
The full DIY install takes 1-2 hours on most modern SUVs and pickups with factory bolt-on provisions. Total cost runs $180-$240 for the hitch unit plus $40-$120 for a torque wrench if you do not already own one. No drilling or welding is required on vehicles built after 2005.
Choose Class III for bike rack and light towing use, Class IV for heavier loads and full-size pickups. Read the install manual fully, prep rusted bolts with penetrating oil, and torque in the specified sequence. Done right, a trailer hitch lasts the life of the vehicle.