Last updated: May 25, 2026
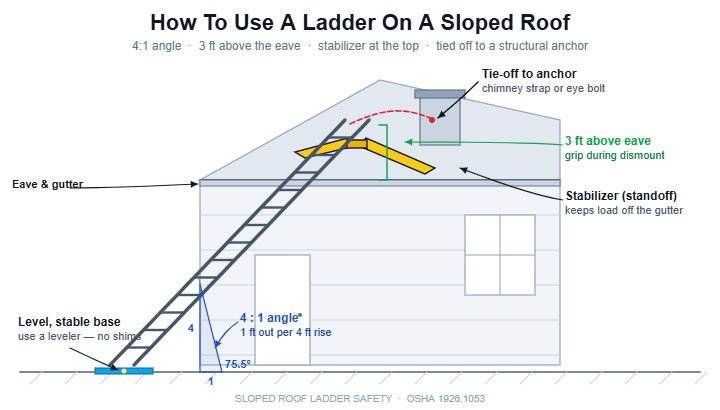
Use a ladder on a sloped roof by securing a ladder stabilizer or roof hook ladder to the ridge, setting your extension ladder at a 75.5-degree angle (the 4:1 ratio) against the eave with the ladder feet on level ground, and tying off the top rail to a fixed anchor point. Never walk a sloped roof above 6:12 pitch without a roof bracket system, a fall harness rated for 5,000 lbs, and a second person on the ground.
Why Is Using A Ladder On A Sloped Roof So Dangerous?
Using a ladder on a sloped roof is dangerous because the combination of a tilting ladder base, an unstable roof surface, and the lack of a fall arrest anchor creates a fall risk that kills roughly 160 to 200 workers in the US every year per OSHA Bureau of Labor Statistics data.
I have spent the better part of two decades watching contractors take shortcuts on sloped roofs that no jobsite supervisor would tolerate inside a building. The roof is not a floor. A 6:12 pitch means the surface drops 6 inches for every 12 inches of run, which is roughly a 26.5-degree angle. Your boots lose meaningful traction above 4:12 pitch on dry asphalt shingles. On wet, mossy, or frosted shingles, you lose traction at 3:12.
The ladder itself adds a second failure mode. A standard extension ladder leaned against an eave creates a pivot point at the gutter. When you transfer weight from the ladder to the roof, the ladder unloads and can kick sideways or backward. I have personally seen a 28-foot Werner D1228-2 kick out by 14 inches when a roofer stepped off onto a 7:12 roof without a stabilizer.
The third risk most articles ignore: the descent. Climbing onto a sloped roof is harder than getting off. You are looking down at a ladder rung that has moved during your time on the roof, and your body geometry is reversed. Roughly 60% of ladder-from-roof falls happen during dismount, not ascent.
The takeaway: a sloped roof is a controlled fall hazard from the moment your ladder touches the gutter. Treat it that way.
What Angle Should A Ladder Be Set At For Roof Access?
Set a ladder at a 75.5-degree angle from the ground, which works out to the 4:1 ratio: for every 4 feet of vertical height to the contact point, the ladder base should sit 1 foot out from the wall. A 20-foot working height puts the ladder feet 5 feet from the building.
The 4:1 rule is not a suggestion. It is the OSHA standard under 1926.1053(b)(5)(i) for portable ladders used in construction. The same angle is published by ANSI A14 for both Type IA and Type IAA ladders. The angle balances tip-over force against slide-out force.
Too shallow (ladder closer to vertical) and the ladder tips backward when you lean away from it. Too steep (ladder feet kicked out farther) and the ladder slides out at the base, especially on smooth concrete, wet grass, or loose gravel.
The quick field check is the “stand and reach” test. Stand at the base of the ladder with your toes touching the side rails. Extend your arms straight out at shoulder height. If your palms touch the rungs at chest level, the angle is correct. If you have to lean forward to touch the rungs, the ladder is too steep. If you would have to step back, it is too shallow.
For roof access specifically, the ladder must extend at least 3 feet (3 rungs) above the roof edge or eave so you have something to grip during the transition. This is OSHA 1926.1053(b)(1). The most common ladder accident I see on residential roofing jobs is a ladder set with the top rail flush to the gutter, which gives the climber nothing to hold during the dismount.
Bottom line: 4:1 angle, 3 feet above the eave, every time.
How Do I Stabilize A Ladder Against A Sloped Roof Or Gutter?
Stabilize a ladder against a sloped roof or gutter by installing a ladder stabilizer (also called a standoff or stay) that spans 19 to 48 inches wide and clamps to the top two rungs, keeping the ladder rails off the gutter and providing 12 inches or more of standoff for safer dismount.
A bare ladder leaned against a metal or vinyl gutter is the single most common mistake on residential exteriors. The gutter is a thin-walled aluminum or steel channel that bends at roughly 30 to 50 lbs of side load. Two minutes of a climber’s weight pressing the side rails against an unsupported gutter section will deform it permanently and may break the spike-and-ferrule or hidden-hanger attachment.
A ladder stabilizer solves three problems at once. It spreads the ladder load across a wider footprint, it keeps the ladder rails off the gutter, and it creates standing room for window or fascia work that a bare ladder cannot offer.
The major options I install and recommend:
The Werner AC78 is a no-tool clamp-on stabilizer that fits any traditional D-rung extension ladder. It spans 49 inches and standoffs 10 inches. List price is around $85.
The Louisville LP-2200-00 spans 47 inches with a 12-inch standoff and includes rubber end caps to protect siding. List price is around $95.
The Little Giant Wing Span is wider at 54 inches, which is what I use for hip roofs where the climber needs to reach around a corner. It runs around $115.
For roof access specifically, a roof hook ladder is the gold standard. This is a separate ladder (usually 16 to 28 feet) with a steel hook that locks over the ridge. You set your extension ladder to the eave, then deploy a smaller hook ladder up the slope. Werner makes a 16-foot hook ladder for around $400.
If you are doing chimney work or steep-pitch repairs more than twice a year, the hook ladder pays for itself the first time you do not slide.
The takeaway: never lean a ladder directly on a gutter or on the roof surface itself without a stabilizer or hook system.
How To Use A Ladder On A Sloped Roof (Step By Step)
Set the extension ladder at 75.5 degrees with feet on level ground, tie off the top rail to a fixed anchor before climbing, climb to within 3 feet of the eave, transition slowly with three points of contact, and deploy a roof hook ladder or roof brackets for any movement on the slope itself.
The sequence that has kept me off my back for 16 years:
Step 1: Inspect The Ladder And Roof Conditions
Check the ladder rails for dents, the rungs for cracks, and the rope and pulley for fraying. Reject any ladder with a bent rail or a missing foot pad. Check the roof for frost, moss, loose granules on asphalt shingles, and wet wood on cedar shake. If the surface temperature is below 40 degrees Fahrenheit and there is any moisture in the forecast, postpone the job. Frost-glazed shingles have roughly the friction coefficient of wet ice.
Step 2: Level The Ladder Base
Set the ladder feet on solid, level ground. Use a ladder leveler accessory like the Werner PK80-2 if the ground slopes more than 2 inches across the base. Never shim a ladder with bricks, scrap lumber, or rocks. The base must be stable side-to-side and front-to-back.
Step 3: Set The Correct Angle And Height
Apply the 4:1 ratio so the ladder feet sit 1 foot out for every 4 feet of vertical height to the contact point. Extend the ladder so the top rail clears the eave by at least 3 feet (3 rungs). Lock the extension rung-locks (also called pawls or dogs) before climbing.
Step 4: Tie Off The Top Of The Ladder
Use a length of 5/16-inch nylon rope or a ratchet strap to secure the top rail to a fixed anchor on the roof or fascia. A simple bowline around a roof eye bolt or chimney strap takes 30 seconds. This step prevents lateral kick-out if you have to lean to one side during the dismount or climb back on.
Step 5: Have A Spotter Hold The Base
For any single-person ascent above 12 feet, a spotter at the base adds redundancy. The spotter holds both side rails firmly with feet braced against the bottom rung. If you are working alone, double down on the tie-off and the base levelers.
Step 6: Climb With Three Points Of Contact
Always maintain three points of contact: two hands and one foot, or two feet and one hand. Face the ladder. Climb steadily without skipping rungs. Carry tools in a tool belt or hoist them up with a rope after you are positioned on the roof. Never carry tools in your hand while climbing.
Step 7: Transition Onto The Roof Carefully
At the eave, grip the top of the ladder rails firmly. Step onto the roof with your dominant foot first, keeping one hand on the ladder until both feet are planted. This is the most common fall point. Do not lean out away from the ladder until both feet are stable on the roof surface.
Step 8: Deploy Roof Hook Ladder For Slope Work
For any work beyond the immediate eave area, deploy a roof hook ladder over the ridge before walking the slope. On pitches above 6:12, also use roof brackets (toe boards) and a fall arrest harness anchored to a permanent roof anchor.
Step 9: Reverse The Process For Dismount
Turn around facing the ladder before descending. Lower yourself by feel for the top rung with your dominant foot. Keep both hands on the roof surface or the ladder rails throughout the transition. Descend at the same steady pace you used to climb.
What this means: a 7-minute setup is a fair trade for avoiding a 6-week recovery.
What Most Ladder-On-Sloped-Roof Guides Get Wrong
The internet is full of articles that tell you to “make sure the ladder is stable” without saying how. After 16 years of watching contractors and DIYers get this wrong, here are the omissions that bother me most.
First, almost no guide mentions the 3-foot extension rule above the eave. Most diagrams show a ladder with the top rung flush to the gutter, which is the exact configuration that causes the dismount fall.
Second, very few guides distinguish between roof pitch ranges. A 4:12 pitch and a 9:12 pitch require completely different equipment. Walking a 4:12 in good rubber-soled boots is reasonable for short tasks. Walking a 9:12 without roof brackets and a harness is reckless.
Third, almost no guide covers the dismount as a separate hazard. The climb up is straightforward because you are looking at what you are gripping. The climb down requires you to step backward off the roof onto a ladder you cannot see, with your weight shifting from a wide surface (the roof) to a narrow one (the ladder rungs).
Fourth, ladder selection gets ignored. A Type IA extension ladder (300 lb capacity) is the minimum for a working adult plus tools. A Type II (225 lb capacity) is not adequate for most roof work once you add a tool belt, harness, and any material being carried.
On a job in Aurora last spring, I watched a homeowner attempt a chimney repair with a 24-foot Type III household ladder (200 lb capacity). He weighed 195 lbs. The ladder failed at the bottom rung weld halfway through the descent. He landed on his hip and was off work for 11 weeks. The ladder cost $179 new. A proper Type IA fiberglass extension would have cost $329. The hospital bill cleared $14,000.
The takeaway: cheap ladders, no tie-off, no stabilizer, and skipped 3-foot extension are how most sloped-roof ladder accidents happen.
What Type Of Ladder Is Best For A Sloped Roof?
A Type IA fiberglass extension ladder (300 lb capacity) paired with a roof hook ladder is the safest combination for residential sloped-roof work. For commercial or industrial roofs above 25 feet, a Type IAA (375 lb capacity) extension ladder is the appropriate rating.
Fiberglass is the right material choice for almost all roof access. Aluminum conducts electricity, which matters anytime you are near service drops, masthead connections, or rooftop electrical equipment. Wood ladders are heavy, weather-sensitive, and obsolete for professional use.
Length sizing matters more than most homeowners realize. The working length of an extension ladder is roughly 4 feet less than the total extended length, because of the overlap between the base and fly sections plus the 3-foot extension above the eave. A 28-foot extension ladder gives you about 24 feet of usable height. For a typical single-story house with a 9-foot ceiling and 4 feet of roof rise to the eave, a 20-foot extension ladder is the minimum. For a two-story with 18 feet to the eave, you need a 28-foot.
The specific models I recommend after handling them on actual jobs:
The Werner D6228-2 is a 28-foot Type IA fiberglass extension at 49 lbs. List price around $329. It is the workhorse of residential roofing.
The Louisville FE3228 is the equivalent 28-foot Type IA fiberglass at 55 lbs. Heavier but slightly stiffer. List around $349.
The Little Giant Velocity M22 is a multi-position 22-foot ladder rated Type IA. It is more versatile but less stable than a true extension ladder for roof work. Best as a second ladder, not a primary roof access ladder.
For the hook ladder, the Werner 16-foot fiberglass roof ladder with hardened steel hooks is the standard. List around $399. Acro Building Systems also makes a fiberglass hook ladder that I prefer for steep-pitch work because the hook geometry is slightly more aggressive.
The takeaway: Type IA fiberglass extension for primary access, plus a dedicated hook ladder for anything past the eave.
How Do I Anchor Or Tie Off A Ladder On A Roof?
Anchor a ladder to a roof by securing the top rail with a rope or strap to a fixed point on the structure: a permanent roof anchor, a chimney strap, a properly installed eye bolt screwed into a rafter, or in a pinch, a sandbag-weighted base with a second-person spotter.
The OSHA-preferred anchor for any rooftop work is a permanent installed roof anchor rated for 5,000 lbs (the standard fall arrest anchor rating). For a one-time job, a temporary ridge anchor like the Guardian Fall Protection 00645 ridge anchor installs with structural screws into the rafters and removes cleanly when you are done.
For the ladder itself, the anchor only needs to prevent lateral and rearward movement, not arrest a fall. A 5/16-inch nylon rope or a 1-inch ratchet strap is adequate. Tie a bowline knot to the top rung and the other end to the anchor point. If you do not know how to tie a bowline, two half-hitches will hold under load.
Do not tie off to a gutter, downspout, fascia trim, vent pipe, or anything that is not structurally connected to the framing. Gutters detach with as little as 50 lbs of pull. PVC vent pipes shatter at room temperature with a hard yank.
For temporary work where no permanent anchor exists, a chimney strap (sometimes called a chimney sling) wraps the full chimney structure and provides a 5,000 lb rated anchor. The Guardian 00100 chimney anchor is around $90 and reusable across jobs.
I once watched a roofer in Boulder tie off to a galvanized plumbing vent stack. The stack pulled out of the roof when he leaned on it. He kept his footing but the resulting roof leak cost the homeowner $1,800 in interior repairs. Anchor only to framing.
What this means: a $20 length of rope plus a chimney strap is the difference between safe roof work and an ambulance ride.
Frequently Asked Questions
What Is The Maximum Roof Pitch I Can Walk Without Roof Brackets?
The maximum walkable pitch without roof brackets and a fall arrest harness is generally 6:12 on dry asphalt shingles with good rubber-soled boots. Above 6:12, OSHA requires fall protection regardless of experience level under 1926.501(b)(11).
In practice, most experienced roofers walk 7:12 dry asphalt with caution and the right footwear, but slip risk climbs sharply. Wet, mossy, or frost-glazed shingles cut these limits roughly in half. A 4:12 wet roof is more slippery than a dry 8:12. If in doubt, deploy roof brackets and tie off to a ridge anchor.
Do I Need A Harness To Use A Ladder On A Sloped Roof?
A harness is not required just to use a ladder against a sloped roof, but OSHA requires fall protection anytime you are working on a roof surface with an unprotected edge that is 6 feet or more above a lower level. This includes most residential rooftops once you step off the ladder.
For a contractor, a Type ABCD full-body harness rated for 5,000 lbs paired with a self-retracting lifeline and a ridge anchor is the standard kit. For a homeowner doing a one-time chimney inspection, at minimum tie off the ladder, work only at the immediate eave, and have a spotter on the ground.
How Do I Get Onto A Roof From An Extension Ladder Safely?
Extend the ladder at least 3 feet (3 full rungs) above the eave so the top rails give you something to grip during the transition. Climb until your waist is at the eave height. Place one hand firmly on each top rail, step onto the roof with your dominant foot first, then bring the second foot up while keeping at least one hand on the ladder.
Do not release the ladder until both feet are planted on the roof with stable footing. Never step from the top rung. Never face away from the ladder during transition. Reverse the process exactly for the dismount, which is the more dangerous of the two transitions.
Can I Use A Step Ladder On A Sloped Roof?
No, a step ladder must not be used on a sloped roof or as a means to access a roof. Step ladders are designed for use on flat, level surfaces in the open A-frame configuration. Using a step ladder leaned against a roof or set on a sloped surface violates OSHA 1926.1053(b)(13) and the ladder’s own ANSI rating.
For roof access, use an extension ladder set at the 4:1 angle. For work on the roof surface itself, use a dedicated roof hook ladder. A multi-position ladder like a Little Giant can be used as an extension ladder for roof access if rated Type IA, but never as a step ladder leaned against a slope.
What Footwear Should I Wear On A Sloped Shingle Roof?
Wear soft rubber-soled work boots specifically designed for roofing, such as the Cougar Paws Estimator boots or the Korkers Bigfoot II with replaceable rubber soles. These boots have a high-friction rubber compound that grips shingle granules without slipping or damaging the roof.
Standard work boots with hard rubber or composite soles have roughly half the traction of dedicated roofing boots on asphalt shingles. Steel-toed boots are even worse because the rigid sole reduces foot contact with the roof surface. Never wear smooth-soled shoes, dress shoes, or any footwear with worn-down tread on a sloped roof.
How Do I Use A Ladder On A Roof With No Gutter Or An Old Damaged Gutter?
With no gutter or a damaged gutter, install a ladder stabilizer (standoff) so the ladder side rails contact the fascia board or wall directly instead of the gutter channel. The Werner AC78 or Louisville LP-2200-00 stabilizer keeps the ladder load off the gutter entirely.
If the fascia is also damaged or rotten, the safer option is to deploy a roof hook ladder set on the opposite slope and access the work area from the ridge. Never lean an extension ladder directly against a rotten fascia or detached gutter. The contact point will fail under load and the ladder will kick out sideways at the base.
The Bottom Line On Using A Ladder On A Sloped Roof
Using a ladder on a sloped roof safely comes down to four non-negotiables: a Type IA extension ladder set at the 4:1 angle, a stabilizer or hook ladder to handle the contact with the roof, a tie-off to a structural anchor at the top, and a fall arrest harness anytime you are working on the roof surface itself above 6:12 pitch or 6 feet of fall exposure.
The equipment investment for safe sloped-roof work runs around $700 to $900 for a Type IA fiberglass extension ladder, a ladder stabilizer, a hook ladder, a chimney anchor, and a fall arrest harness with self-retracting lifeline. That is roughly one-tenth of what a single ER visit and short-term disability costs after a 12-foot fall.
The shortcuts that kill people are predictable. Top rung flush to the gutter. No tie-off. No stabilizer. Wet shingles in 38-degree weather. A 200-lb capacity household ladder under a 195-lb worker. Step ladder leaned against the eave. Smooth-soled boots. Tool belt left at the truck so tools get carried up in one hand.
Every one of those mistakes is correctable in under 15 minutes of setup time. The roof will still be there.
Do the setup right, climb steadily, transition slowly at the eave, deploy your hook ladder before walking the slope, and reverse the process exactly for the dismount. That is how you use a ladder on a sloped roof and come home with all your bones intact.