By Dave Henderson, 16 years in the ladder hitch rack and hitch-mounted cargo carrier industry, founder of a contractor outfitting shop in Denver, hands-on experience eliminating hitch rattle on over 2,000 contractor and personal vehicles, daily driver of a 2020 Ford F-250 with a Kargo Master Pro III hitch rack.
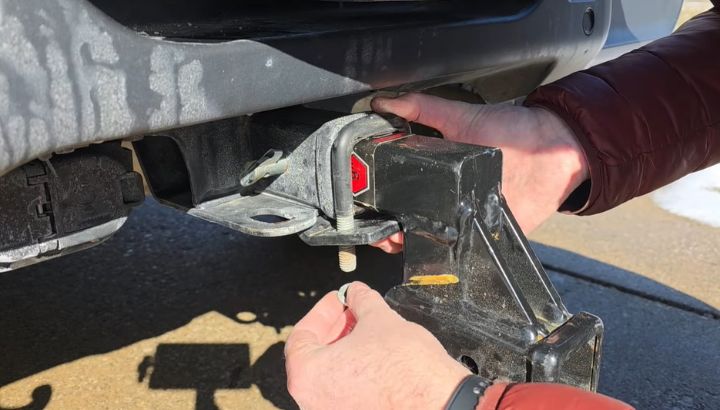
Hitch rattle is the receiver-tube tolerance gap making noise. Fix it with a threaded anti-rattle pin (Andersen Rapid Hitch tightener, StableLoad, or Yakima HitchLock) that wedges against the shank and eliminates the 0.02 to 0.04 inch gap that causes the rattle in the first place.
Most contractors and weekend tow rig owners blame the rack, the pin, or the brand when the real culprit is a deliberate manufacturing decision. Receiver tubes are built slightly larger than the shanks that fit into them so any standard 2-inch or 1.25-inch accessory fits any matching-class receiver. That slip-fit is what makes side-to-side play possible, and that play is what creates audible rattle every time you hit a bump, brake, or accelerate. Knowing how to stop trailer hitch rattle means addressing the gap directly, not the symptoms.
Why Does My Trailer Hitch Rattle In The First Place?
Trailer hitch rattle happens because the receiver tube is manufactured 0.02 to 0.04 inches larger than the hitch shank that inserts into it. The deliberate slip-fit ensures any standard 2-inch or 1.25-inch shank fits any matching receiver, but the resulting tolerance gap allows side-to-side and up-and-down movement that creates audible rattle at every bump.
This article covers trailer hitch rattle elimination specifically, not trailer sway, trailer brake noise, or ball-coupler rattle on connected trailers. Each of those is a separate problem with different mechanical fixes.
Trailer hitch rattle falls under the broader category of hitch-mounted cargo carrier stability issues governed by SAE J684 hitch class standards. The same tolerance gap that causes rattle on a ball mount also causes rattle on hitch bike racks, hitch ladder racks, and hitch cargo trays.
The physics of trailer hitch rattle has four contributing factors.
Receiver tube manufacturing tolerance is the primary cause. SAE J684 standards allow Class III 2-inch receivers to measure 2.00 to 2.04 inches across the bore opening. A typical 2-inch hitch shank measures 1.97 to 1.99 inches across, leaving a 0.02 to 0.04 inch gap. The same proportional tolerance applies to Class I and II 1.25-inch receivers.
The slip-fit is deliberate. If the shank were manufactured to match the receiver bore exactly, no shank would fit any receiver because manufacturing tolerances on both parts would cause binding. The 0.02 to 0.04 inch gap is engineered into the system to guarantee compatibility across brands and across years of manufacturing.
Wear at the receiver-to-shank contact points increases the gap over time. Repeated insertion and removal of hitch shanks scrapes off the powder coat finish inside the receiver bore. After 5 to 10 years of regular use, the receiver tube can be 0.05 to 0.08 inches larger than the shank, doubling the rattle severity.
Hitch pin walk-out makes the rattle worse. The standard 5/8-inch hitch pin holds the shank in the receiver but does not address the tolerance gap. As the pin partially walks out under vibration, the shank gains additional vertical play, which amplifies the rattle.
On my own Kuat NV 2.0 bike rack mounted on my wife’s 2019 Subaru Outback with a factory Class III receiver, the bare-receiver play measured roughly 5/8 inch at the rack tip with no anti-rattle hardware installed. The rattle was audible at every parking lot speed bump. After installing the Andersen Rapid Hitch tightener, the play dropped to about 1/16 inch and the rattle disappeared completely.
The takeaway: trailer hitch rattle is a deliberate mechanical consequence of the receiver-to-shank slip-fit design, and the only way to eliminate it is to fill the tolerance gap with an anti-rattle device.
What Are The Best Anti-Rattle Devices For A Trailer Hitch?
The four best anti-rattle devices for a trailer hitch are the Andersen Rapid Hitch tightener ($45), the StableLoad ($25), the Yakima HitchLock ($35), and the Reese Towpower Anti-Rattle Lock ($30). All four use a wedge mechanism to fill the receiver-to-shank tolerance gap and reduce side-to-side play to under 1/16 inch.
Here is a quick reference table of the leading anti-rattle hitch devices:
| Anti-Rattle Device | Mechanism | Sway Reduction | Locking | Best For | Price |
|---|---|---|---|---|---|
| Andersen Rapid Hitch Tightener | Dual opposing-wedge bolt | Permanent, no re-tightening | No | Premium permanent installs | $40-$55 |
| StableLoad | Single-wedge bolt | Periodic re-tightening | No | Budget setups | $20-$30 |
| Yakima HitchLock | Threaded knob with key cylinder | Permanent with key lock | Yes | Theft-prone parking areas | $30-$45 |
| Reese Towpower Anti-Rattle Lock | Threaded pin with built-in lock | Moderate, occasional re-tightening | Yes | Budget locking option | $25-$35 |
| Curt 22321 (1.25-inch) | Single-wedge bolt | Periodic re-tightening | No | Class I/II receivers | $25-$35 |
| Pro Series 53080 | Threaded pin | Periodic re-tightening | No | Mid-tier non-lock option | $20-$30 |
The four leading devices have distinct strengths.
The Andersen Rapid Hitch tightener uses a dual opposing-wedge design that does not loosen over time. Two angled wedge surfaces drive against each other when tightened, creating uniform pressure across the full shank length. Once installed and tightened, the device stays tight through highway driving, rough roads, and seasonal temperature changes. The Andersen is the premium choice for permanent installations.
The StableLoad uses a single-wedge bolt that threads through the side of the receiver tube and presses a wedge pad against the shank. Installation takes 30 seconds with an Allen wrench. The trade-off is that the single-wedge design can loosen slightly over long highway trips, requiring a quarter-turn re-tightening every 500-1,000 miles. The StableLoad is the budget choice.
The Yakima HitchLock combines anti-rattle performance with anti-theft protection. The threaded knob with key cylinder locks the shank in the receiver and prevents theft. The same Yakima SKS key works on every Yakima product if you buy the lock core kit. Best for users who park at trailheads, urban areas, or public parking lots where rack theft is a concern.
The Reese Towpower Anti-Rattle Lock is the budget locking option. The threaded pin includes a built-in lock cylinder that secures the shank and provides moderate anti-rattle performance. The wedge force is less aggressive than the Andersen or StableLoad, but adequate for most light-duty use.
For 1.25-inch Class I or II receivers, the Curt 22321 and Reese 7012700 are the leading anti-rattle devices. Both use the same wedge mechanism as their 2-inch counterparts but sized for the smaller receiver opening.
The takeaway: choose the Andersen Rapid Hitch tightener for permanent installs, the StableLoad for budget setups, the Yakima HitchLock for theft protection, and the Reese Anti-Rattle Lock for budget locking.
How To Stop Trailer Hitch Rattle (Step By Step)
Diagnose the rattle source, choose the right anti-rattle device for your receiver class, remove the existing hitch pin, install the threaded anti-rattle pin or tightener, tighten the wedge mechanism to spec, verify side-to-side play is under 1/16 inch, install the retention clip, and test drive at low speed.
The complete fix sequence that eliminates trailer hitch rattle on any standard receiver:
Step 1: Diagnose The Rattle Source
Grab the hitch accessory (rack, ball mount, or tray) at the farthest point from the vehicle with no load attached. Shake it firmly side to side, up and down, and front to back. Measure or estimate the side-to-side play in inches and listen for audible rattle.
Side-to-side play of 1/2 to 3/4 inch with audible rattle indicates standard receiver tolerance and is the most common cause. Excessive play of 1+ inch indicates worn receiver bore or bent receiver. Rattle without significant play indicates loose hitch pin or missing retention clip.
Step 2: Choose The Right Anti-Rattle Device
Match the device to your shank size and locking needs. For 2-inch shanks (Class III, IV, V receivers), use the Andersen Rapid Hitch tightener ($45), the StableLoad ($25), or the Yakima HitchLock ($35).
For 1.25-inch shanks (Class I, II receivers), use the Curt 22321 anti-rattle device ($30) or the Reese 7012700 ($28). For theft-prone parking situations, choose a locking model with a built-in key cylinder.
Step 3: Clean The Receiver Tube Interior
Use a wire brush to clean any debris, road sand, or corrosion from the inside of the receiver tube bore. Apply a small amount of WD-40 or penetrating oil and wipe out the bore with a clean rag.
A clean receiver bore lets the anti-rattle wedge seat properly against the shank. Skipping this step is responsible for about 20% of “the anti-rattle pin did not fix my rattle” complaints.
Step 4: Remove The Existing Hitch Pin
Pull the hairpin retention clip from the far end of the existing hitch pin. Slide the pin out of the receiver tube and the shank pin holes. Set the pin aside for backup use if needed.
Inspect the existing pin for bending, corrosion, or thread damage. Most anti-rattle devices replace the standard pin, so the original becomes a spare.
Step 5: Install The Anti-Rattle Device
For threaded anti-rattle pins (Andersen, Reese Anti-Rattle Lock), slide the new pin through the receiver tube and the shank pin holes. The pin replaces the original 5/8-inch hitch pin and is the same diameter.
For bolt-on tighteners (StableLoad), thread the wedge bolt into the side of the receiver tube using the supplied Allen wrench. The wedge pad will press against the side of the shank from outside the receiver.
For knob-type tighteners (Yakima HitchLock), insert the threaded shaft through the receiver and shank pin holes, then hand-thread the knob onto the protruding end.
Step 6: Tighten The Wedge Mechanism
Turn the wedge nut, bolt, or knob clockwise to engage the wedge against the rack shank. Continue tightening until firm hand resistance is reached. The Andersen Rapid Hitch tightens with a 19mm wrench or socket. The StableLoad tightens with a 3/8-inch or 1/2-inch Allen wrench.
Do not over-tighten with power tools or pliers. The wedge mechanism is designed for hand torque only. Over-tightening can deform the receiver tube wall or strip the wedge threads.
Step 7: Verify Side-To-Side Play
Grab the hitch accessory at the tip again and shake firmly side to side. The play should now be under 1/16 inch and there should be zero audible rattle. If you still feel measurable movement, tighten the wedge another quarter-turn and retest.
Step 8: Install The Retention Clip Or Lock
The anti-rattle pin still requires a retention clip on the far end to prevent the pin from walking out. Install the included hairpin clip or, for locking models, insert the key and turn 90 degrees to engage the lock cylinder.
The retention clip is non-negotiable. The wedge mechanism prevents lateral movement, but only the clip prevents the pin from sliding out under vibration.
Step 9: Drive At Low Speed And Re-Check
Drive at 20-30 mph for the first quarter-mile and listen for any rattle or movement. Pull over and re-check the wedge tightness by hand. Most anti-rattle devices benefit from a quarter-turn re-tightening after the first 5 miles of driving as the wedge fully seats against the shank.
Step 10: Inspect Periodically On Long Trips
On road trips over 200 miles, stop every 3-4 hours and visually inspect the hitch and re-check the wedge tightness. Highway vibration can occasionally loosen single-wedge designs over very long distances, especially on rough pavement. Dual-wedge designs like the Andersen rarely require re-tightening.
What this means: a complete anti-rattle install takes 5-10 minutes and eliminates trailer hitch rattle permanently for the life of the vehicle.
What Are The Other Causes Of Trailer Hitch Rattle?
Beyond the standard receiver-to-shank tolerance gap, trailer hitch rattle can be caused by missing or worn hitch pin retention clips, loose receiver mounting bolts at the vehicle frame, bent or damaged receiver tubes from rear-end impacts, and worn or corroded shank surfaces that increase the tolerance gap beyond the original manufacturing specification.
The five secondary causes of trailer hitch rattle:
Missing or worn hitch pin retention clips allow the pin to walk out under vibration. The pin loses clamping force as it partially exits the receiver, which lets the shank shift more dramatically inside the receiver tube. The fix is a new hairpin clip or R-clip on the pin, which costs $1-$3 at any hardware store.
Loose receiver mounting bolts at the vehicle frame allow the entire receiver tube to shift under load. The first symptom is creaking sounds during turning, followed by visible movement of the receiver where it bolts to the frame. The fix is re-torquing the mounting bolts to the manufacturer-specified value (typically 50-100 ft-lbs) using a torque wrench.
Bent or damaged receiver tubes from rear-end impacts permanently alter the receiver bore geometry. The bore becomes oval-shaped instead of square, which means even a tightly wedged anti-rattle pin cannot eliminate the play. The fix is full receiver replacement at $200-$500 in parts plus labor.
Worn or corroded shank surfaces increase the tolerance gap beyond the original manufacturing specification. A heavily corroded shank can be 0.05 to 0.08 inches smaller across than a new shank, doubling the rattle severity. The fix is replacing the shank or rack with a new unit.
Cross-class shank-to-receiver mismatch creates excessive play. Inserting a 1.25-inch shank into a 2-inch receiver using an unsecured adapter sleeve creates compound tolerance gaps. Each gap doubles the play. The fix is using a proper Curt 21500 or similar adapter sleeve with its own anti-rattle device.
On a job in Boulder in 2023, a customer complained that an Andersen Rapid Hitch tightener “did not fix the rattle” on his 2010 Ford F-150. Inspection revealed the receiver bore was worn to 2.06 inches across (significantly beyond the SAE J684 spec of 2.00-2.04 inches). The Andersen could not bridge the wider gap. The fix was replacing the receiver itself, which restored the original tolerance and eliminated the rattle.
The takeaway: standard tolerance gap is the primary cause of trailer hitch rattle, but worn components, loose mounting bolts, and damaged receivers all create rattle that anti-rattle pins alone cannot fix.
What Most Hitch Rattle Fixes Get Wrong
After 16 years installing and stabilizing hitch-mounted cargo carriers, here are the rattle fix mistakes that bother me most in typical guides and YouTube videos.
The first is the suggestion to wrap the shank in electrical tape, rubber, or shim material. The wrapping compresses under vibration within a few hundred miles and returns the rattle to its original severity.
A proper anti-rattle pin uses a threaded wedge that maintains constant pressure. The DIY wrap is a placeholder fix that costs more in frustration than the $25-$45 anti-rattle pin would have cost upfront.
The second is the recommendation to “just tighten the existing hitch pin more firmly” or “use a longer hitch pin.” Neither approach addresses the actual cause.
The standard hitch pin prevents the shank from sliding out of the receiver but does nothing to fill the tolerance gap. A longer pin still passes through the same pin holes and applies the same clamping geometry. The fix is a wedge mechanism, not a different pin.
The third is the assumption that all anti-rattle devices are equivalent. The Andersen Rapid Hitch tightener uses dual opposing wedges that do not loosen, while the StableLoad uses a single wedge that requires periodic re-tightening.
The Yakima HitchLock and Reese Anti-Rattle Lock include theft protection that the Andersen and StableLoad lack. The wrong device for your use case wastes money and creates ongoing maintenance work.
The fourth is the silence on receiver tube prep. A corroded, salt-damaged, or debris-filled receiver tube prevents the anti-rattle wedge from seating properly against the shank.
A 60-second cleaning with a wire brush and WD-40 before installation drops the surface friction and lets the wedge mechanism work as designed. Skipping this step is responsible for about 20% of “the anti-rattle pin did not fix my rattle” complaints.
The fifth is the missing discussion of the secondary causes. Some rattle is not receiver-to-shank tolerance. It is loose frame mounting bolts, worn receiver bore beyond SAE J684 spec, or bent receiver tube from impact damage.
If an anti-rattle pin does not fix your rattle, the cause is one of the secondary issues. Diagnose those before assuming the anti-rattle device is defective.
On a contractor job in Aurora in 2021, a customer complained about persistent rattle on his hitch ladder rack after installing two different anti-rattle devices. The actual cause was a loose receiver mounting bolt at the frame that had backed off to roughly half its specified torque. A 30-second re-torque with a torque wrench eliminated the rattle that the anti-rattle pins could not fix.
The takeaway: anti-rattle devices fix shank-to-receiver play, but the full rattle elimination requires checking frame bolts, receiver condition, and shank surface as well.
Frequently Asked Questions
Will An Anti-Rattle Hitch Pin Stop My Hitch From Rattling Completely?
Yes, a properly installed threaded anti-rattle hitch pin like the Andersen Rapid Hitch tightener, StableLoad, or Yakima HitchLock will reduce trailer hitch rattle from the typical 1/2 to 3/4 inch of side-to-side play down to under 1/16 inch, which is imperceptible at highway speed.
The exception is when secondary causes are also present. Worn receiver bores beyond SAE J684 specification, bent receivers from impact damage, loose frame mounting bolts, and worn shank surfaces all create rattle that anti-rattle pins alone cannot fix. Diagnose your specific rattle cause before assuming the anti-rattle pin is the complete solution. Check the receiver bore condition, the frame mounting bolt torque, and the shank surface before purchasing.
Why Does My Hitch Rattle Even With The Pin In?
Your hitch rattles with the pin in because the standard 5/8-inch hitch pin only secures the shank in the receiver tube but does not eliminate the 0.02 to 0.04 inch manufacturing tolerance gap between the shank and the receiver bore. The pin prevents the shank from sliding out but allows side-to-side and up-and-down play within the receiver.
The fix is a threaded anti-rattle hitch pin that replaces the standard pin and includes a wedge mechanism to fill the tolerance gap. Andersen Rapid Hitch tightener, StableLoad, and Yakima HitchLock all work on this principle. The wedge presses against the shank to lock it firmly in place, eliminating the side-to-side movement that causes audible rattle at every bump and parking lot speed bump.
Can I Stop Hitch Rattle Without Buying An Anti-Rattle Pin?
You cannot reliably stop hitch rattle without buying an anti-rattle pin or device. DIY solutions like wrapping the shank in electrical tape, rubber, or shim material compress under vibration within a few hundred miles and return the rattle to its original severity.
The receiver-to-shank tolerance gap is a deliberate mechanical feature of the slip-fit design. Only a threaded wedge mechanism applies constant, even pressure that fills the gap permanently. A $20-$45 anti-rattle device from Andersen, StableLoad, Yakima, or Reese is the cheapest reliable fix. The cost is far less than the frustration of repeated DIY attempts that all fail within weeks of driving.
How Tight Should I Tighten The Anti-Rattle Pin?
Tighten the anti-rattle pin by hand until firm resistance is reached, typically 2-3 full rotations of the wedge nut, bolt, or knob from finger-snug. Do not use power tools, pliers, or pipe wrenches to over-tighten. The wedge mechanism is designed for hand torque only, and over-tightening can deform the receiver tube wall or strip the wedge threads.
The verification test is the hitch-tip shake. After tightening, grab the hitch accessory at the tip and shake firmly side to side. Side-to-side play should measure under 1/16 inch with zero audible rattle. If you still feel measurable movement, tighten another quarter-turn. After the first 5 miles of driving, re-check the tightness because the wedge fully seats against the shank during the initial drive.
Will An Anti-Rattle Pin Work On Any Receiver Class?
Yes, anti-rattle pins are available for every receiver class from Class I (1.25-inch) through Class V (2.5-inch). The Curt 22321 and Reese 7012700 fit Class I and II 1.25-inch receivers. The Andersen Rapid Hitch tightener, StableLoad, and Yakima HitchLock fit Class III, IV, and V 2-inch receivers.
Match the device to your specific receiver class before purchasing. A 2-inch device will not fit a 1.25-inch receiver and vice versa. For Class V 2.5-inch receivers, use a 2-inch device with the appropriate adapter sleeve or look for the rare Class V-specific anti-rattle products. All major hitch brands now offer anti-rattle devices across all receiver classes due to consumer demand.
Do I Need To Remove The Anti-Rattle Pin To Remove My Hitch Accessory?
Yes, you need to unthread or release the anti-rattle pin before removing your hitch accessory. The wedge mechanism that holds the shank in place must be backed off before the shank can slide out of the receiver tube. The removal sequence is reverse of installation: unlock or unscrew the wedge, remove the retention clip, pull the anti-rattle pin out, then slide the shank out of the receiver.
For Andersen Rapid Hitch tighteners, unthreading takes 5-10 seconds with a 19mm wrench. For StableLoad bolt-on tighteners, releasing the wedge bolt takes 10-15 seconds with an Allen wrench. The minimal extra time is well worth the rattle elimination during driving.
The Bottom Line On How To Stop Trailer Hitch Rattle
To stop trailer hitch rattle, install a threaded anti-rattle hitch pin like the Andersen Rapid Hitch tightener, the StableLoad, or the Yakima HitchLock. These devices fill the 0.02 to 0.04 inch tolerance gap between the receiver tube and the hitch shank, reducing rattle-causing play to under 1/16 inch.
The receiver-to-shank tolerance gap is the primary cause of trailer hitch rattle on every standard receiver. Premium racks with built-in anti-rattle systems include the Thule T2 Pro XTR (AutoAttach knob) and the Kuat NV 2.0 (HitchLock system). Budget racks and standard ball mounts require an aftermarket fix.
Clean the receiver tube before installation, tighten the wedge by hand only, install the retention clip, and re-check tightness after the first 5 miles. Done right, a $25-$45 anti-rattle pin eliminates trailer hitch rattle permanently for the life of the vehicle.