By Dave Henderson, 16 years in the ladder hitch rack and hitch-mounted cargo carrier industry, founder of a contractor outfitting shop in Denver, hands-on experience hooking and unhooking trailers, hitch ladder racks, and cargo carriers on over 2,000 contractor and personal vehicles, daily driver of a 2020 Ford F-250 with a Kargo Master Pro III hitch rack.
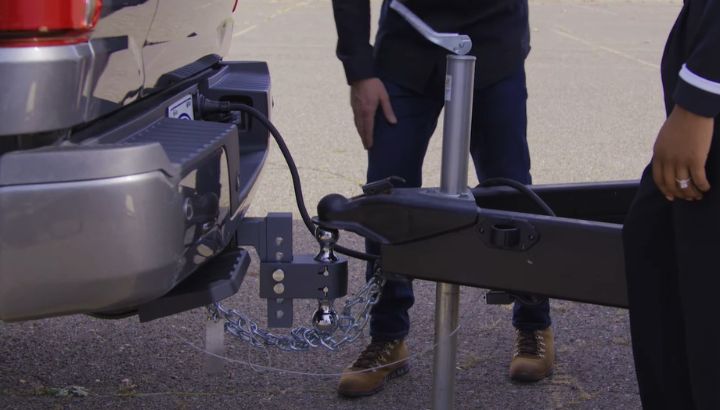
Wheel chocks come first, every single time. Place them tight against the trailer wheels, disconnect the wiring harness, unclip the breakaway cable, drop the safety chains, release the coupler latch, crank the tongue jack until the coupler clears the hitch ball by 1-2 inches, then drive forward in a straight line.
Driveway accidents happen most often because someone shortcuts the order of operations. A loaded utility trailer on even a 2-degree grade rolls fast enough to dent a tailgate, crush a foot, or hit a parked vehicle the instant the coupler releases. Anyone learning how to unhook a trailer hitch should treat the chocks as step zero and reverse the original hooking sequence on every disconnect, with no exceptions for grade or trailer weight.
What Is The Trailer Hitch Unhooking Process And Why Does It Matter?
The trailer hitch unhooking process is the sequence of safety steps required to disconnect a trailer from a tow vehicle without damaging either vehicle, the trailer brakes, the electrical system, or the people in the area. The process reverses the hooking sequence and takes 3-5 minutes when done correctly.
This article covers unhooking a trailer from a standard ball-and-coupler hitch specifically, not gooseneck hitch disconnection, fifth-wheel uncoupling, or pintle hitch release. Each of those is a separate process with different mechanical steps.
Trailer hitch unhooking falls under the broader category of safe towing procedures governed by FMCSA cargo securement regulations and SAE J684 hitch class standards. The process is straightforward but the consequences of skipping steps range from minor inconvenience to serious vehicle damage or personal injury.
The four main safety risks of incorrect trailer hitch unhooking:
Trailer rollaway happens when the trailer wheels are not chocked before the coupler releases. A loaded trailer on even a 2-degree grade can roll fast enough to crush a foot or strike the tow vehicle’s bumper. Wheel chocks are non-negotiable on any slope.
Wiring harness damage happens when the trailer is unhooked with the 4-pin or 7-pin connector still plugged in. Driving away rips the connector apart, damages the harness on both vehicles, and creates a $50-$200 repair bill.
Breakaway cable activation happens when the cable is still clipped to the tow vehicle during separation. The cable yanks free, triggers the trailer brakes immediately, and locks the trailer wheels until you can manually release the brake actuator. This is a feature, not a bug, but it makes uncoupling impossible until you reset the system.
Coupler damage happens when the trailer tongue jack is raised too aggressively or not enough. Raising too aggressively can bend the jack or strain the coupler weld. Raising too little means the coupler grinds against the hitch ball as you drive forward, scoring the ball surface and damaging the coupler interior.
On my own contractor trailer setup, I once unhooked too fast without chocking the wheels on a 3-degree driveway grade. The trailer rolled 4 feet downhill before I could grab it, hit my truck’s rear bumper, and left a dent that cost $480 to repair. The wheel chocks cost $15. I never skipped them again.
The takeaway: trailer hitch unhooking is a 3-5 minute safety process where every step prevents a specific failure mode, and shortcuts always cost more than they save.
What Tools And Safety Gear Do I Need To Unhook A Trailer Hitch?
You need wheel chocks (2 minimum, rubber or plastic), the trailer’s jack handle, work gloves for grip and protection, and any tools required to release the coupler latch mechanism (most modern couplers are tool-free with a flip-lever, but some older units need a wrench).
Here is the complete checklist of tools and safety gear for trailer hitch unhooking:
| Item | Specification | Purpose | Cost |
|---|---|---|---|
| Wheel Chocks | Rubber or plastic, pair minimum | Prevent trailer rollaway | $15-$30 |
| Trailer Jack Handle | Manual crank or pin | Raise trailer tongue | Included with trailer |
| Work Gloves | Leather or synthetic | Grip and protection | $10-$25 |
| Coupler Latch Tool | Wrench or screwdriver (older trailers) | Release stubborn latches | Already owned |
| Flashlight | Any | Inspect connections in low light | $10-$25 |
| Coupler Lock (Optional) | Brass or steel padlock | Secure trailer when parked | $20-$50 |
| Jack Stand (Optional) | 2-ton minimum capacity | Support trailer on uneven ground | $20-$50 |
| Penetrating Oil | PB Blaster or WD-40 | Loosen stuck couplers | $6-$10 |
Wheel chocks are the single most important safety item. A pair of rubber chocks from Harbor Freight or any hardware store costs $15-$30 and prevents the most common trailer hitch unhooking accident: rollaway.
The trailer jack handle is included with most trailers but can be lost over time. Replacement handles cost $10-$20 and are available at trailer parts stores or online. Some heavy-duty trailers use power tongue jacks that run off the tow vehicle’s electrical system or a battery on the trailer itself.
Work gloves prevent grease and dirt from coating your hands when handling the coupler, safety chains, and breakaway cable. Leather work gloves provide the best grip and protection for $10-$25.
A flashlight matters more than people realize. Trailer connections frequently happen in low light: early morning farm trips, evening returns from job sites, or shaded parking lots. A small LED flashlight clipped to your work shirt lets you see the coupler latch position and verify the breakaway cable is fully disconnected.
A coupler lock is optional but recommended for trailers parked overnight or in public areas. The lock prevents theft of the trailer by locking the coupler in the open position, which prevents anyone from hitching it to their own vehicle. Master Lock 377 and CURT 23508 are common options at $20-$50.
For trailers with stuck or corroded couplers, penetrating oil applied 5-10 minutes before unhooking loosens the latch mechanism. Salt-belt trailers develop coupler corrosion that locks the latch in the closed position, requiring PB Blaster or WD-40 to release.
The takeaway: wheel chocks, gloves, and a flashlight cover 90% of trailer hitch unhooking jobs, with under $50 in total cost.
How To Unhook A Trailer Hitch (Step By Step)
Park on level ground, chock the trailer wheels, disconnect the safety chains and breakaway cable, unplug the wiring harness, release the coupler latch, raise the trailer tongue with the jack until the coupler clears the hitch ball, then slowly drive the tow vehicle forward away from the trailer.
The complete unhooking sequence that prevents the four main failure modes:
Step 1: Park On Level Ground When Possible
Park the tow vehicle and trailer on a flat paved surface like a garage floor, concrete driveway, or asphalt parking lot. Level ground eliminates the rollaway risk and makes the unhooking sequence faster. If level ground is unavailable, position the trailer so any rollaway direction is away from people, vehicles, and obstacles.
Step 2: Engage The Parking Brake And Shift Into Park
Engage the tow vehicle’s parking brake and shift the transmission into Park (automatic) or first gear (manual). The combination prevents the tow vehicle from rolling during the unhooking process. Some heavy-duty trucks include a trailer brake control that should also be set to maximum gain before separation.
Step 3: Chock The Trailer Wheels
Place wheel chocks tight against the front and rear of at least one trailer wheel on each side. Chocks must be in physical contact with the tire, not placed loosely nearby. The chocks prevent the trailer from rolling when the coupler releases from the hitch ball. This is the single most important safety step in the entire process.
Step 4: Disconnect The Trailer Wiring Harness
Unplug the 4-pin flat or 7-pin RV connector from the tow vehicle’s harness receptacle. Twist and pull the connector straight back to release the locking detents. Replace the protective cover on the trailer connector and tuck the harness away from the coupler so it does not get pinched during separation.
Step 5: Unclip The Breakaway Cable
Unclip the breakaway cable from the tow vehicle’s safety chain loop or anchor point. The breakaway cable is the small cable (usually 12-18 inches long) that triggers the trailer brakes if the trailer separates unexpectedly during driving. Unclipping it during normal unhooking prevents accidental brake activation.
Step 6: Disconnect The Safety Chains
Unhook both safety chains from the tow vehicle’s safety chain loops. Most chains use S-hooks or quick-link clevises that twist or unscrew to release. Inspect the chains for wear and store them looped over the trailer’s A-frame to prevent them from dragging on the ground during the next tow.
Step 7: Release The Coupler Latch
Lift the coupler latch handle on the trailer coupler to the open position. Most modern couplers have a flip-lever or sliding latch that releases by hand. Older trailers may have a threaded latch nut that requires partial unscrewing. The latch must be fully open before raising the trailer tongue.
Step 8: Raise The Trailer Tongue With The Jack
Crank the trailer’s tongue jack handle clockwise (typical direction) to raise the trailer tongue. Continue raising until the coupler clears the hitch ball by 1-2 inches with visible gap. Avoid raising more than necessary because excess height makes the next hookup more difficult and strains the jack.
Step 9: Verify The Coupler Is Free Of The Ball
Visually inspect the gap between the coupler and the hitch ball. Both should be completely separated with no contact. If the coupler is still resting on the ball, raise the jack another 1-2 inches. If the coupler is hung up on the ball, gently rock the trailer side to side while raising the jack.
Step 10: Slowly Drive The Tow Vehicle Forward
Disengage the parking brake on the tow vehicle and slowly drive forward in a straight line away from the trailer. Watch the trailer in the rearview mirrors to verify it stays in place. Drive at least 6 feet forward to clear the trailer completely before turning the steering wheel. The trailer should remain stationary with no movement.
What this means: a careful 3-5 minute unhooking sequence prevents the four main failure modes and protects both the tow vehicle and the trailer from damage.
What Are The Most Common Mistakes When Unhooking A Trailer Hitch?
The five most common trailer hitch unhooking mistakes are skipping the wheel chocks, forgetting to disconnect the wiring harness before driving away, leaving the breakaway cable clipped during separation, raising the tongue jack too aggressively, and driving forward before verifying the coupler is fully clear of the ball.
The specific unhooking mistakes I see most often after 16 years in the industry:
Skipping the wheel chocks is the most dangerous mistake. Without chocks, a loaded trailer on even a slight grade can roll the moment the coupler releases. The rollaway can damage the tow vehicle’s bumper, crush a foot or hand, or strike other vehicles or property in the area. Chocks cost $15-$30 and are non-negotiable.
Forgetting to disconnect the wiring harness before driving away rips the connector apart. The 4-pin or 7-pin connector locks with detent pins that hold against normal pulling force. Driving away with the harness still connected tears the wires from both connectors and damages the harness on both the tow vehicle and the trailer. Repair costs range from $50-$200.
Leaving the breakaway cable clipped during separation activates the trailer brakes immediately. The cable yanks free of the trailer brake actuator, applies full brake force to the trailer wheels, and locks the wheels until you can manually release the brake mechanism. The trailer becomes immovable until reset.
Raising the tongue jack too aggressively bends the jack or strains the coupler weld. Most tongue jacks are rated for 1,000-2,000 lbs of vertical lifting force. Cranking against a stuck coupler can exceed the rating and bend the jack permanently. Replacement jacks cost $40-$150.
Driving forward before verifying the coupler is fully clear of the ball causes scrape damage. The coupler scrapes across the top of the hitch ball, scoring the ball surface and gouging the coupler interior. Both components need replacement at $30-$80 for the ball and $50-$150 for the coupler.
On a job in Aurora last fall, a contractor unhooked his utility trailer without chocking the wheels on a 2-degree grade. The trailer rolled into his Ford F-150 bumper, leaving a $480 dent. The cause was rushing through the unhooking process to get back to the job site faster. Wheel chocks would have prevented the entire incident.
The takeaway: every trailer hitch unhooking mistake is predictable and preventable with a 3-5 minute methodical approach.
What Should I Do If The Trailer Coupler Is Stuck On The Hitch Ball?
A stuck trailer coupler is usually caused by corrosion at the latch mechanism, debris between the coupler and ball, or insufficient tongue jack lift height. Apply penetrating oil to the latch, raise the jack 1-2 more inches, and rock the trailer side to side to break the bond.
A stuck coupler is one of the most common trailer hitch unhooking problems, especially on older trailers or trailers stored outdoors.
Corrosion at the latch mechanism is the primary cause. Salt-belt trailers (Michigan, Ohio, Pennsylvania, upstate New York) develop coupler latch corrosion that locks the latch in the closed position even when the handle is in the open position. The fix is penetrating oil applied to the latch pivot points, with 5-10 minutes of soaking time before attempting to release.
Debris between the coupler and ball prevents clean separation. Road sand, dried mud, ice, and small stones can wedge between the coupler interior and the hitch ball surface. Cleaning the coupler interior with a wire brush and lubricating with white lithium grease before each hookup prevents this problem.
Insufficient tongue jack lift height is the easiest cause to fix. Crank the tongue jack another 1-2 inches higher and visually verify the coupler is completely clear of the ball. The gap should be visible from both sides of the coupler.
Side-to-side rocking breaks the friction bond. Gently rock the trailer side to side at the tongue while continuing to crank the jack. The combined motion breaks any debris-induced sticking and allows the coupler to lift free.
For severely stuck couplers, a rubber mallet can be used to tap the coupler upward at the front edge. Avoid using a metal hammer, which can damage the coupler casting. The rubber mallet provides enough force to break the bond without damaging the part.
In extreme cases (frozen or rusted couplers), heating the latch mechanism with a heat gun for 30-60 seconds can expand the metal slightly and break the corrosion bond. Never use an open flame near the trailer fuel system, battery, or wiring.
On a winter job in 2020, I had a customer’s utility trailer with a frozen coupler after sitting in 10-degree weather overnight. The fix was 5 minutes with a heat gun on the latch mechanism plus a quarter cup of warm water poured over the coupler-to-ball contact area. The coupler released cleanly after the ice melted.
What this means: a stuck coupler has predictable causes (corrosion, debris, insufficient lift, freezing) and predictable fixes (penetrating oil, jack height, rocking, heat).
What I Wish I Knew Before My First Trailer Hitch Unhooking
After 16 years of trailer work and watching customers learn the hard way, here are the lessons I wish someone had given me before my first unhooking in 2009.
The first lesson is that wheel chocks are not optional. I learned this from a $480 bumper repair on my own truck after a trailer rolled 4 feet downhill. A $15 pair of rubber chocks would have prevented the entire incident. Now I keep chocks in every truck I drive, and I refuse to unhook a trailer without using them.
The second lesson is that the unhooking sequence is the reverse of the hooking sequence. If you hooked up by chocking, raising the coupler, attaching the safety chains, attaching the breakaway cable, plugging in the wiring, then lowering onto the ball, you should unhook by raising the coupler, unplugging the wiring, unclipping the breakaway cable, disconnecting the safety chains, then removing the chocks last. Reversing the order keeps the process intuitive.
The third lesson is that the breakaway cable is not the same as a safety chain. The breakaway cable triggers the trailer brakes if the trailer separates during driving. Treat it as a critical safety device, not as a third safety chain. Always unclip it during normal unhooking to prevent accidental brake activation.
The fourth lesson is that tongue jack technique matters. Cranking too aggressively bends the jack handle. Cranking with the latch still closed strains the coupler weld. Cranking past full extension can damage the jack threads. Always release the latch first, then crank smoothly with consistent pressure.
The fifth lesson is that visual verification matters. Always look at the gap between the coupler and ball before driving forward. A 1-2 inch visible gap confirms the coupler is fully clear. Anything less means scrape damage when you drive away. The 5-second visual check prevents hundreds of dollars in repair costs.
The takeaway: chock the wheels, reverse the hooking sequence, treat the breakaway cable seriously, crank the jack smoothly, and verify the coupler is clear before driving away.
Frequently Asked Questions
How Long Does It Take To Unhook A Trailer Hitch?
A typical trailer hitch unhooking takes 3 to 5 minutes when done correctly with the full safety sequence. The steps include chocking the wheels, disconnecting the wiring harness, unclipping the breakaway cable, disconnecting the safety chains, releasing the coupler latch, raising the tongue jack, and driving forward.
Experienced trailer users complete the process in 3 minutes with practice. First-time users typically take 5-10 minutes including verifying each step. Adding 60-90 seconds for proper chocking and visual verification is always worth the time. Rushing through the unhooking process is the cause of most trailer-related accidents in driveways and parking lots.
What Happens If I Don’t Chock The Trailer Wheels Before Unhooking?
If you do not chock the trailer wheels before unhooking, the trailer can roll when the coupler releases from the hitch ball. On level ground the rollaway is minimal, but on even a 2-degree grade a loaded trailer can roll fast enough to crush a foot, strike the tow vehicle bumper, or hit other vehicles or property.
Wheel chocks are the single most important safety device for trailer hitch unhooking. A pair of rubber chocks from Harbor Freight or any hardware store costs $15-$30. The chocks must be in physical contact with the front and rear of at least one wheel on each side, not just placed loosely nearby. Skipping chocks to save 30 seconds is the most common cause of trailer-related driveway accidents.
Can I Unhook A Trailer By Myself Or Do I Need Help?
Yes, you can unhook a trailer by yourself, and most trailer hitch unhooking is done solo. The full process (chock wheels, disconnect wiring and chains, release coupler latch, raise tongue jack, drive forward) is designed to be completed by one person without assistance.
A helper makes the process slightly faster and provides backup safety verification, but is not required for typical residential or contractor trailers. For very heavy trailers (over 8,000 lbs gross weight), large boat trailers, or trailers on uneven terrain, a helper improves safety by spotting the coupler clearance as you drive forward and verifying the trailer remains stable after disconnection.
How Do I Know If The Trailer Coupler Is Properly Disconnected From The Hitch Ball?
You know the trailer coupler is properly disconnected from the hitch ball when there is a visible 1-2 inch gap between the coupler interior and the ball surface. The gap should be visible from both sides of the coupler with no metal-to-metal contact. The tongue jack should be supporting the full trailer tongue weight, not the hitch ball.
Visual verification is the only reliable confirmation. Do not assume the coupler is clear based on the jack handle resistance or the trailer position. A 5-second visual check prevents scrape damage to the coupler interior and the hitch ball surface. If you cannot see a clear gap, raise the jack another 1-2 inches and verify again before driving forward.
What Should I Do With The Trailer After I Unhook It?
After you unhook a trailer, lower the tongue jack to a stable parking height (typically 18-24 inches above the ground), engage the trailer’s parking brake if equipped, install a coupler lock to prevent theft, and verify the wheel chocks remain in place. Cover the wiring harness connector with the protective cap to prevent corrosion.
For long-term storage, place the trailer on jack stands at the front and rear of the frame to take weight off the tires. Lubricate the coupler latch and ball socket with white lithium grease before storing to prevent corrosion. Store the safety chains looped over the trailer A-frame to prevent dragging during the next tow. Inspect the breakaway cable battery periodically and replace as needed.
Why Won’t My Trailer Coupler Release From The Hitch Ball?
A trailer coupler that will not release from the hitch ball is usually caused by corrosion at the latch mechanism, debris between the coupler and ball, insufficient tongue jack lift height, or a frozen coupler in cold weather. Apply penetrating oil like PB Blaster or WD-40 to the latch pivot points and let it soak for 5-10 minutes before retrying.
Raise the tongue jack 1-2 more inches and gently rock the trailer side to side while cranking. The combined motion breaks the friction bond and allows the coupler to lift free. For severely stuck couplers in freezing weather, heat the latch mechanism with a heat gun for 30-60 seconds to expand the metal and break the corrosion bond. Never use an open flame near the trailer.
The Bottom Line On How To Unhook A Trailer Hitch
To unhook a trailer hitch, chock the wheels, disconnect the wiring harness and breakaway cable, unhook the safety chains, release the coupler latch, raise the tongue jack until the coupler clears the ball, then slowly drive forward away from the trailer.
The full sequence takes 3-5 minutes and prevents the four main failure modes: trailer rollaway, wiring harness damage, breakaway cable activation, and coupler scrape damage. Wheel chocks are the single most important safety device and cost $15-$30 for a quality pair.
Verify a visible 1-2 inch gap between the coupler and ball before driving forward. Reverse the hooking sequence for consistency, and treat the breakaway cable as a critical safety device. Done right, trailer hitch unhooking protects both vehicles and prevents driveway accidents that cost hundreds of dollars in repairs.