Last updated: May 25, 2026
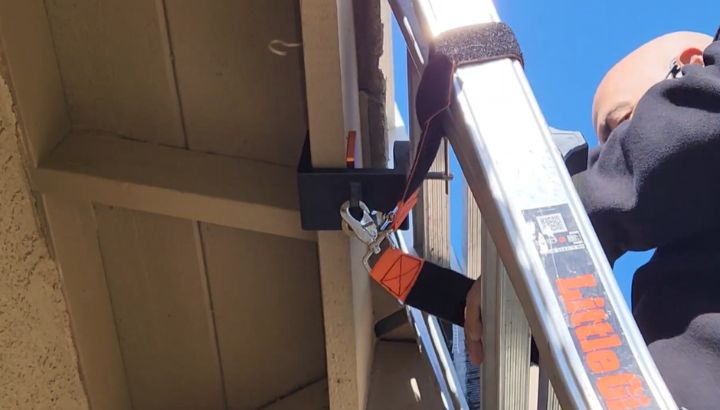
Tie off a ladder by securing the top rail to a structural anchor (eye bolt, roof anchor, chimney strap) using a 5/16-inch nylon rope or 1-inch ratchet strap with a bowline or two half-hitches knot, and securing the base with a stake-and-rope system or a second-person spotter.
Top tie-off prevents lateral kick-out. Base tie-off prevents forward slide. Both are required under OSHA 1926.1053(b)(8) for any ladder used continuously for more than a short task or set on slippery or unstable surfaces.
What Are The OSHA Requirements For Ladder Tie-Off?
OSHA 1926.1053(b)(8) requires ladders to be secured against displacement when used in locations where they can be displaced by workplace activities or traffic, or be provided with a barricade to keep activities away from the ladder. OSHA 1910.23(b)(9) extends the same requirement to general industry. Tie-off is the standard method of securing.
The OSHA rules around ladder tie-off are more specific than most contractors realize. The core requirements:
OSHA 1926.1053(b)(8) requires that ladders be used only on stable and level surfaces unless secured to prevent accidental displacement, and that ladders used in locations where they can be displaced by workplace activities or traffic be secured to prevent accidental displacement or be barricaded to keep activities away.
OSHA 1926.1053(b)(7) requires ladders not be used on slippery surfaces unless secured or provided with slip-resistant feet. Polished hardwood, marble, tile, wet concrete, and metal decking all qualify as slippery and require tie-off or anti-slip mats.
OSHA 1910.23(b)(9) (general industry equivalent) requires that ladders be inspected before each use and removed from service if damaged, and secured to prevent accidental movement during use.
OSHA 1926.501(b)(11) requires fall arrest systems on roof work above 6 feet with unprotected edges, which means any ladder used for roof access on a typical residential or commercial building requires tie-off of the ladder plus a separate fall arrest system for the worker on the roof.
The specific tie-off methods OSHA accepts include rope tie-off to a structural anchor at the top rail, ratchet strap tie-off to a structural anchor, stake-and-rope securing of the base on outdoor jobs, second-person hold at the base for short-duration tasks (typically under 15 minutes), and mechanical ladder securing devices like the LadderLock system or the Werner LockJaw.
Non-acceptable securing methods include tying off to gutters, downspouts, vent pipes, fascia trim, deck railings, or any non-structural element. Bungee cords, twine, baling wire, and improvised lashings all fail the OSHA standard because they cannot reliably hold under load.
Penalties for ladder tie-off violations run $16,131 per ladder for serious violations and up to $161,323 per violation for willful or repeated violations under the 2025 OSHA penalty schedule. The violations are routinely cited during workplace safety inspections, especially on commercial and industrial sites.
The takeaway: OSHA does not treat ladder tie-off as optional, and the rules are explicit about what counts and what does not.
Why Does A Ladder Need To Be Tied Off At All?
A ladder needs to be tied off because the base feet and the upper contact point are subject to displacement forces during normal use. Without tie-off, a ladder can kick out at the base when the climber leans sideways, slide out when the climber transfers weight to a roof, or fall sideways when struck by workplace traffic.
The physics here are straightforward. An extension ladder leaned against a wall depends on three force vectors to stay in place: the downward gravity force at the base, the friction force between the foot pads and the ground, and the reaction force at the top contact point. Any disturbance to one of these vectors can cause the ladder to displace.
The most common displacement modes I see in the field:
Lateral kick-out at the top, where the climber leans to one side to reach a fixture and the ladder pivots on its base, throwing the top contact point sideways and dropping the climber. This is the failure mode tie-off at the top prevents.
Forward slide at the base, where the climber transfers weight to a roof or upper landing and the unloaded ladder base slides forward away from the building. This is the failure mode tie-off at the base prevents.
Backward fall from a vertical setup, where the angle is too steep (less than 4:1) and the ladder falls backward away from the wall as the climber leans away. Tie-off at the top prevents this when combined with correct setup angle.
Traffic strike displacement, where a vehicle, scaffold, lift, or other equipment bumps the ladder during use. Tie-off plus barricades prevent this on active job sites.
I lost a Werner D6228-2 28-foot extension ladder this way in 2019 on a stairwell paint job in Boulder. I had the base on a stair tread without tie-off at the top. When I leaned out to cut in along the ceiling, the bottom kicked, the ladder bounced down the stairwell, and I rode it to the bottom landing with cracked ribs. A $20 length of rope tied to a chimney strap would have prevented the entire incident.
The takeaway: ladder tie-off addresses the predictable failure modes of leaned ladders and is not optional for any work above 10 feet or any work on slippery, uneven, or trafficked surfaces.
What Materials Do I Need To Tie Off A Ladder Properly?
You need 50 feet of 5/16-inch braided nylon rope (3,000 lb tensile strength) OR a 1-inch x 15-foot ratchet strap (1,500 lb working load), a structural anchor point such as a chimney strap, roof anchor, or eye bolt rated for 5,000 lbs, and basic knowledge of two knots: the bowline and the two half-hitches.
The right materials prevent the tie-off from becoming the weakest link in the system.
For the rope, 5/16-inch braided nylon is the industry standard. It has a tensile strength of around 3,000 lbs, resists UV degradation, and ties knots that hold under load. Avoid 1/4-inch rope (too thin to grip securely with knots) and 3/8-inch rope (overkill for ladder use and harder to tie tight knots in). A 50-foot length costs around $15 at any hardware store and lasts 3 to 5 years of regular use.
For ratchet straps, 1-inch x 15-foot straps with 1,500 lb working load and 4,500 lb breaking strength are appropriate. The Erickson 9100 and the Keeper 03508 are reliable options at around $12 to $18 per strap. Avoid lightweight 1-inch straps with 500 lb working loads (sold for general cargo tie-down) because they lack the safety margin for ladder securing.
For the structural anchor, the options depend on the work environment:
A Guardian Fall Protection 00100 chimney strap or chimney sling wraps the full chimney structure and provides a 5,000 lb rated anchor. List around $90 and reusable across jobs.
A Guardian 00645 ridge anchor screws into the rafters with structural screws and provides a permanent 5,000 lb anchor. List around $40 per anchor and stays installed for future jobs.
An eye bolt screwed into a rafter or structural framing member provides a budget anchor. Use a 3/8-inch by 4-inch lag eye bolt rated for at least 800 lbs (typical hardware store rating) and pre-drill the pilot hole at 1/4-inch diameter.
For interior work, an anchor strap looped around a permanent structural element (steel beam, structural column) provides a reusable anchor without modification to the building.
The knots are the simplest part of the system. The bowline creates a fixed loop that does not slip or tighten under load and is the standard ladder tie-off knot. Two half-hitches provide a quick alternative when speed matters. Both knots take 10 seconds to tie once you have practiced them a few times.
What does NOT work: bungee cords (insufficient holding force, prone to dynamic release), twine or baling wire (insufficient tensile strength), zip ties (cut under load), duct tape (no rated holding force), and improvised lashings with random rope (unrated and unreliable).
Bottom line: $30 in materials buys a complete ladder tie-off system that lasts for years and meets OSHA requirements.
How To Tie Off A Ladder (Step By Step)
Set the ladder at the correct 4:1 angle, identify a structural anchor point above the work area, run a 5/16-inch nylon rope from the top rung to the anchor and tie a bowline knot at each end, secure the base with a stake-and-rope on outdoor jobs or a second-person spotter on interior jobs, and verify the tie-off is tight before climbing.
The procedure that meets OSHA and keeps you upright on every job:
Step 1: Set The Ladder At The Correct Angle First
Set the extension ladder at the 4:1 angle (75.5 degrees) before tying off. The base should be 1 foot out from the wall for every 4 feet of vertical height to the contact point. Extend the top at least 3 feet (3 rungs) above the eave or upper landing for roof access. Tying off a ladder at the wrong angle locks in the bad setup and creates a false sense of security.
Step 2: Identify A Structural Anchor Point
Locate a structural anchor point at or above the work area. Acceptable anchors include permanent roof anchors, chimney straps, structural eye bolts in rafters, steel beams, structural columns, or properly installed temporary ridge anchors. Reject anchors on gutters, downspouts, vent pipes, fascia trim, deck railings, light fixtures, and any non-structural element.
Step 3: Cut Or Measure The Rope To Length
Cut a length of 5/16-inch braided nylon rope that runs from the top rail of the ladder to the anchor point with at least 3 feet of slack for knot tying at each end. For most residential jobs, 15 to 25 feet of rope is appropriate. Seal the cut ends with a flame from a lighter to prevent fraying.
Step 4: Tie A Bowline Knot To The Top Rung
Tie a bowline knot around the top rung of the ladder. The bowline creates a fixed loop that does not slip or tighten under load. To tie a bowline: form a small loop in the rope leaving a tail, pass the tail up through the loop, around the standing line, and back down through the loop. Pull tight. The knot should look like the letter “B” laid flat.
Step 5: Run The Rope To The Anchor Point
Run the rope from the top rung up and over to the anchor point. Avoid running the rope across sharp edges (gutter corners, metal flashing, brick edges) that can abrade or cut the rope under load. If a sharp edge is unavoidable, pad it with a folded cloth or a rope chafe protector.
Step 6: Tie The Anchor End With Two Half-Hitches
Tie the anchor end of the rope around the structural anchor with two half-hitches. To tie a half-hitch: pass the rope around the anchor, then bring the tail back across the standing line and pass it under and through the loop formed. Repeat for the second half-hitch. Pull tight. Two half-hitches are simpler than a bowline and hold reliably for ladder tie-off.
Step 7: Tighten The Rope Between Anchor And Ladder
Pull the rope tight between the anchor and the ladder before final tightening of the half-hitches. The rope should have zero slack. A loose tie-off allows lateral movement at the top of the ladder, which defeats the purpose. The rope should be tight enough to ring like a guitar string when plucked.
Step 8: Secure The Base Of The Ladder
For outdoor jobs, drive a 12-inch steel stake into the ground 3 feet behind the ladder base and tie a 5/16-inch rope from the bottom rung to the stake using two half-hitches. This prevents forward slide at the base. For interior jobs or hard surfaces where staking is not possible, station a second-person spotter at the base with their hands on both side rails and one foot on the bottom rung.
Step 9: Test The Tie-Off Before Climbing
Shake the ladder firmly side to side and front to back at the base. Any movement at the top contact point indicates a loose tie-off. Retighten the rope and re-test. The ladder should feel as solid as if bolted to the wall when properly tied off.
Step 10: Climb With Three Points Of Contact
Climb with three points of contact (two hands and one foot, or two feet and one hand) facing the ladder. The tie-off does not eliminate the need for safe climbing technique. It prevents catastrophic ladder displacement, but the climber is still responsible for maintaining grip and balance on the rungs.
What this means: a complete ladder tie-off takes 3 to 5 minutes and provides protection against the most common ladder fall mechanisms.
What Knots Should I Use For Ladder Tie-Off?
The two essential knots for ladder tie-off are the bowline (used at the top rung of the ladder to create a fixed non-slipping loop) and two half-hitches (used at the anchor end for quick reliable securing). Both knots hold under load, untie cleanly when the job is finished, and take less than 15 seconds to tie with practice.
Knot selection matters because the wrong knot can slip under load or jam too tightly to untie.
The bowline is the gold standard for the ladder end of the tie-off. It creates a fixed loop that does not slip or tighten when the load comes onto the rope. The loop size stays exactly what you tied. After the job, the bowline unties easily even after holding load. To tie a bowline, the old mnemonic “the rabbit comes out of the hole, around the tree, and back down the hole” works for most people.
Two half-hitches are the standard for the anchor end. They are faster to tie than a bowline and hold reliably for static loads like ladder tie-off. The downside of two half-hitches is they can tighten under heavy dynamic load and become difficult to untie, but ladder tie-off loads are static and predictable so this is rarely an issue.
The taut-line hitch (sometimes called the adjustable hitch) is useful when you need to adjust rope tension after tying. It slides along the standing line under hand pressure but holds firm under load. Useful for tie-offs where the anchor and ladder are not at a fixed distance.
The trucker’s hitch creates a mechanical advantage for tightening the rope tension. Useful for situations where you need to pull the rope very tight, such as base stake-out on outdoor jobs or temporary fixed ladder securing on a vertical surface.
Avoid knots that slip (square knot, granny knot) and knots that jam (constrictor knot, double overhand). Avoid using a single knot type for both ends of the rope because the bowline-on-bowline configuration requires more rope and is harder to tighten properly.
For contractors who do not want to memorize knots, the alternative is ratchet straps. The Erickson 9100 ratchet strap secures with a mechanical buckle and requires no knot-tying skill. Two ratchet straps (one at the top, one at the base) replace the knot system entirely at a cost of around $25 to $30 per setup.
What this means: bowline plus two half-hitches handles 95% of ladder tie-off scenarios. Ratchet straps are the knot-free alternative.
Know More: How To Repair A Fiberglass Ladder
Common Mistakes I See In Contractor Lots With Ladder Tie-Off
After 16 years in the access industry, here are the tie-off mistakes that come up over and over on job sites.
The first mistake is tying off to gutters. Aluminum and vinyl gutters detach with as little as 50 lbs of pull at the spike-and-ferrule or hidden-hanger attachment. I have personally watched a roofer in Aurora tie off to a gutter, lean out from the ladder, and pull the entire 12-foot gutter section off the fascia. The roofer kept his footing on the ladder, but the gutter destroyed a homeowner’s flower bed and cost $400 to replace.
The second mistake is tying off to vent pipes. Galvanized plumbing vent stacks and PVC vent pipes are not structural and will pull out of the roof under tie-off load. The resulting roof leak typically costs more than the ladder fall would have. Always anchor to framing, not plumbing.
The third mistake is using bungee cords. Bungee cords stretch under static load and release dynamically when they reach maximum stretch. A bungee-tied ladder can release the top contact point at the worst possible moment. Bungee cords are appropriate for cargo tie-down where dynamic absorption is wanted, never for ladder tie-off where rigid securing is required.
The fourth mistake is skipping the base securing. Top tie-off prevents lateral kick-out, but the base can still slide forward when the climber transfers weight to a roof or upper landing. Both ends of the ladder need securing on any job above 12 feet or any setup on slippery ground.
The fifth mistake is over-tightening with a ratchet strap. Ratchet straps can apply 1,500 lbs of mechanical force, which is enough to bend an aluminum ladder rail. Tighten ratchet strap tie-offs only until the rope ring is taut, not until the ladder visibly flexes.
On a job in Lakewood last fall, I watched a homeowner tie off a 24-foot Werner extension ladder with bungee cords looped around a deck railing. The deck railing was a 1.5-inch wood top rail attached to 4×4 posts with deck screws. He climbed to the second-from-top rung to clean a gutter. The bungee cord stretched, the ladder kicked out, the deck railing snapped, and he fell 16 feet onto a concrete patio. Broken collarbone, fractured wrist, 8 weeks of disability. A $15 rope to a chimney strap would have prevented the entire incident.
The takeaway: every tie-off mistake I see is predictable and preventable with the right materials and a 5-minute setup.
Frequently Asked Questions
Do I Always Need To Tie Off A Ladder Or Only For Certain Jobs?
OSHA 1926.1053(b)(8) requires ladder securing whenever the ladder can be displaced by workplace activities, traffic, or unstable conditions. Tie-off is required for any ladder used continuously for more than a short task, any ladder set on slippery surfaces, any ladder used near traffic or workplace activity, and any ladder used for roof access where the climber transfers weight to a roof.
For short-duration tasks (under 5 minutes) on stable level ground with no traffic, OSHA accepts a second-person spotter at the base in lieu of tie-off. For all longer tasks and any work above 10 feet, tie-off is the standard practice and frequently the legal requirement. When in doubt, tie off.
What Is The Best Anchor Point For Tying Off A Ladder?
The best anchor points for ladder tie-off are permanent roof anchors rated for 5,000 lbs, chimney straps that wrap the full chimney structure (Guardian 00100), structural eye bolts installed in rafters or structural framing, and steel beams or structural columns on commercial buildings. All of these provide reliable anchor points that hold up under load.
Avoid anchoring to gutters, downspouts, vent pipes, fascia trim, deck railings, light fixtures, antenna mounts, satellite dishes, and any non-structural element. These all fail under tie-off load and create secondary damage to the building. For temporary jobs with no permanent anchor, a chimney strap is the most versatile option at around $90 and reusable across hundreds of jobs.
Can I Tie Off A Step Ladder Or Only Extension Ladders?
Step ladders are self-supporting and typically do not require tie-off in standard A-frame use on stable level ground. However, step ladders used on slippery surfaces, uneven ground, near traffic, or in trade-specific high-risk situations should be secured per OSHA 1926.1053(b)(8). The securing method for a step ladder is usually base stake-out or spotter rather than top tie-off.
Multi-position ladders used in extension mode (Little Giant Velocity, Werner MT-22) follow the same tie-off requirements as standard extension ladders. Telescoping ladders also require top tie-off in extension mode. Any ladder leaned against a vertical surface for access work needs securing at the top to prevent lateral displacement.
How Tight Should A Ladder Tie-Off Rope Be?
A ladder tie-off rope should be tight enough to eliminate all slack between the top rail of the ladder and the anchor point. The rope should ring like a guitar string when plucked with your finger and have no visible sag along its length. Looseness allows lateral movement at the top of the ladder, which defeats the purpose of the tie-off.
Avoid over-tightening with ratchet straps, which can apply 1,500 lbs of force and bend aluminum ladder rails. The correct tension is “rope taut, no sag” not “rope as tight as the strap can pull.” For knot-based tie-offs, pull the rope hand-tight before tying the final knot. For ratchet strap tie-offs, ratchet to taut and stop.
What Should I Do If There Is No Anchor Point Available?
If no anchor point is available at the work area, the alternatives are to install a temporary anchor such as a Guardian 00645 ridge anchor (screws into rafters with structural screws), use a chimney strap if a chimney is present (wraps the full chimney for a 5,000 lb anchor), station a second-person spotter at the base of the ladder, or reschedule the job until an anchor can be installed.
For commercial work on buildings without anchors, the safer approach is to install permanent fall protection anchors before starting work. The cost of two permanent roof anchors ($80 to $120) is trivial compared to the cost of a fall injury. For homeowner one-time jobs without anchors, a spotter is the minimum acceptable substitute for tie-off.
Can I Use A Ratchet Strap Instead Of Rope For Ladder Tie-Off?
Yes, a 1-inch by 15-foot ratchet strap with 1,500 lb working load (Erickson 9100, Keeper 03508) is an acceptable substitute for rope tie-off and is preferred by contractors who do not want to tie knots. The ratchet strap secures with a mechanical buckle and provides reliable static holding force.
Avoid lightweight 1-inch ratchet straps with 500 lb working loads (sold for general cargo tie-down) because they lack the safety margin for ladder securing. Avoid ratcheting the strap to maximum tightness, which can bend aluminum ladder rails. Tighten only until the strap is taut and the ladder is fully secured. Two ratchet straps (one top, one base) replace the full rope system at around $25 per setup.
The Bottom Line On How To Tie Off A Ladder For Safety
Tie off a ladder by securing the top rail to a structural anchor (chimney strap, roof anchor, eye bolt) with 5/16-inch nylon rope or a 1-inch ratchet strap using a bowline at the ladder end and two half-hitches at the anchor end, plus securing the base with a stake-and-rope or spotter.
Never tie off to gutters, vent pipes, or non-structural elements. OSHA 1926.1053(b)(8) requires this on most jobs above 10 feet or on slippery surfaces.
A complete tie-off costs $30 in materials, takes 5 minutes to set up, and prevents the most common ladder fall mechanisms.