Last updated: May 25, 2026
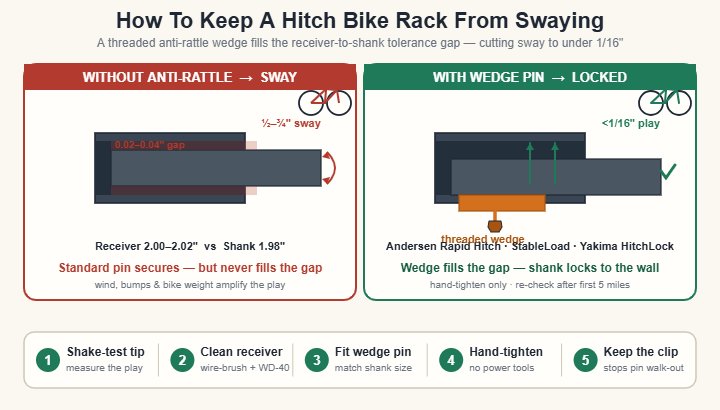
To keep hitch bike rack from swaying, install a threaded anti-rattle hitch pin like the Andersen Rapid Hitch tightener, the StableLoad, or the Yakima HitchLock. These devices eliminate the 1/2 to 3/4 inch tolerance gap between the rack shank and the receiver tube, reducing sway to under 1/16 inch.
The sway problem affects every hitch-mounted bike rack regardless of brand because receiver tubes are manufactured slightly larger than the shanks that fit into them. Class III 2-inch receivers actually measure 2.00 to 2.02 inches inside, while a typical bike rack shank measures 1.98 inches across. That 0.02 to 0.04 inch gap is what causes the rack and bikes to swing at highway speeds. Eliminating it requires a wedge mechanism that fills the gap permanently.
Why Does My Hitch Bike Rack Sway In The First Place?
Hitch bike rack sway happens because the receiver tube is manufactured slightly larger than the rack shank, creating a 0.02 to 0.04 inch tolerance gap that allows side-to-side and up-and-down movement. Highway speed wind, road bumps, and bike weight amplify this movement into visible sway at the rack tip.
This article covers hitch-mounted bike rack sway specifically, not roof rack flutter, trunk-mounted strap rack shifting, or trailer sway from towing. Each of those is a different mechanical problem with different fixes.
Hitch bike rack sway falls under the broader category of hitch-mounted cargo carrier stability issues, governed by the same receiver-to-shank tolerance math that affects ladder racks, cargo trays, and any other hitch accessory. Anti-rattle pins, hitch tighteners, and stabilizer brackets all address this category of problem regardless of which specific accessory is mounted.
The physics of hitch bike rack sway breaks down into three forces.
Lateral force comes from crosswinds, vehicle lane changes, and sharp braking. The wind hits the side of the loaded rack and pushes it sideways. Without a tight receiver-to-shank fit, the rack pivots inside the receiver tube and the tip swings 2-4 inches off center at highway speeds.
Vertical force comes from road bumps, expansion joints, and rough pavement. Each bump transfers energy from the wheels through the suspension into the receiver. A loose receiver-to-shank fit lets the rack bounce up and down, which amplifies the sway and can cause the hitch pin to walk out over time.
Rotational force comes from the weight of the bikes themselves cantilevered behind the receiver. A 4-bike platform rack with 4 bikes loaded sits 24-36 inches behind the receiver pin, creating a moment arm that amplifies any rotational movement in the receiver tube. The longer the rack extends behind the vehicle, the more visible the sway becomes.
On my own Kuat NV 2.0 setup on my wife’s 2019 Subaru Outback, the stock receiver fit produced about 5/8 inch of side-to-side play measured at the rack tip with 3 bikes loaded. After installing the Andersen Rapid Hitch tightener, the play dropped to roughly 1/16 inch and the sway became imperceptible at highway speed.
The takeaway: hitch bike rack sway is caused by receiver-to-shank tolerance, not by rack quality or installation error. Even premium racks like the Kuat NV 2.0 and Thule T2 Pro XTR sway without an anti-rattle fix.
Know More: How To Install A Trailer Hitch
What Causes Hitch Bike Rack Sway?
The five main causes of hitch bike rack sway are receiver-tube manufacturing tolerance, missing or worn anti-rattle hardware, hitch pin walk-out, overloaded racks beyond tongue weight rating, and bent or damaged receiver tubes from prior impact damage.
Here is a quick reference table of sway causes and their specific fixes:
| Sway Cause | How To Diagnose | Fix | Cost |
|---|---|---|---|
| Receiver-tube tolerance gap | 1/2-3/4 inch side-to-side play at rack tip | Threaded anti-rattle hitch pin (Andersen, StableLoad, Yakima HitchLock) | $15-$50 |
| Missing factory anti-rattle hardware | Audible rattle at any speed | Install built-in tightener (Thule AutoAttach, Kuat HitchLock) | Included on premium racks |
| Hitch pin walk-out | Pin slides out during driving | Add hairpin retention clip or locking pin cylinder | $5-$25 |
| Overloaded rack | Visible rack droop with load | Reduce load or upgrade to higher-capacity rack | Varies |
| Bent receiver tube | Rack sits angled or twisted | Replace receiver tube | $200-$500 |
| Worn shank surface | Polished/shiny shank with deep wear marks | Replace rack or add shim | $50-$300 |
| Loose mounting bolts on receiver | Visible movement at frame attachment | Re-torque mounting bolts to spec | Free |
| Wrong shank size for receiver | 1.25″ shank in 2″ receiver without adapter | Install correct adapter sleeve (Curt 21500) | $25-$40 |
The specific causes I see most often fall into three buckets.
Receiver-tube manufacturing tolerance is the primary cause on 90% of bike rack sway complaints. SAE J684 hitch class standards allow receiver tubes to measure 2.00 to 2.04 inches inside for Class III/IV receivers.
Bike rack shanks are manufactured at 1.97 to 1.99 inches to ensure they fit even the smallest receiver opening. That deliberate undersize creates the tolerance gap that causes sway. No amount of careful installation eliminates this gap without a wedge mechanism.
Missing or worn anti-rattle hardware affects budget racks specifically. Premium racks like the Thule T2 Pro XTR (AutoAttach knob) and the Kuat NV 2.0 (HitchLock system) include built-in anti-rattle mechanisms.
Budget racks like the MaxxHaul 70210, Tyger Auto TG-RK4B102B, and Allen Sports Deluxe ship with a basic 5/8-inch hitch pin and clip and zero anti-rattle hardware. These racks always sway out of the box and require an aftermarket fix.
Hitch pin walk-out causes catastrophic sway because the pin partially exits the receiver tube during driving. As the pin walks out, the rack-to-receiver connection loses clamping force and the rack swings more dramatically.
A missing retention clip is the most common cause. The standard 5/8-inch hitch pin requires a hairpin clip on the far end to prevent vibration-induced movement. Every Thule, Kuat, and Yakima rack ships with a clip, but riders often lose them or forget to install them.
On a job in Colorado Springs in 2023, a client complained of severe sway on his Allen Sports Deluxe 4-bike rack at 55 mph. Inspection revealed the hitch pin had walked out 1.5 inches and the rack was rotating in the receiver tube. A new $5 hairpin clip plus a $25 StableLoad anti-rattle pin solved the problem permanently.
The takeaway: identify which of the five causes matches your symptoms before throwing parts at the problem.
How To Keep Hitch Bike Rack From Swaying (Step By Step)
Diagnose the sway cause, choose the right anti-rattle device for your shank size, remove the existing hitch pin, install the threaded anti-rattle pin or tightener, tighten the wedge mechanism to spec, verify side-to-side play is under 1/16 inch, and load test before driving.
The complete fix sequence that works on every hitch-mounted bike rack:
Step 1: Diagnose The Sway Cause
Grab the rack at the tip (farthest from the vehicle) with no bikes loaded and shake it firmly side to side, up and down, and front to back. Measure or estimate the side-to-side play in inches. Note any audible rattle, visible pin movement, or rack rotation in the receiver tube.
Side-to-side play of 1/2 to 3/4 inch indicates receiver-tube tolerance. Audible rattle without visible play indicates loose pin or missing retention clip. Rack droop or twist indicates overloading or bent receiver tube.
Step 2: Choose The Right Anti-Rattle Device
Match the device to your shank size and receiver class. For 2-inch shanks (Class III, IV, V receivers), use the Andersen Rapid Hitch tightener ($45), the StableLoad ($25), or the Yakima HitchLock ($35).
For 1.25-inch shanks (Class I, II receivers), use the Curt 22321 anti-rattle device ($30) or the Reese Towpower 7012700 ($28). For Thule racks with the AutoAttach system, no aftermarket device is needed because the built-in knob handles the tightening.
Step 3: Remove The Existing Hitch Pin
Pull the hairpin retention clip from the far end of the existing hitch pin. Slide the pin out of the receiver tube. Set the pin aside for re-use after the anti-rattle device is installed. Inspect the pin for bending, corrosion, or thread damage and replace if needed.
Step 4: Install The Anti-Rattle Pin Or Tightener
Slide the threaded anti-rattle hitch pin through the receiver tube and rack shank pin holes. The pin replaces the standard 5/8-inch hitch pin. Hand-thread the wedge nut onto the protruding end of the pin until the nut snugs against the receiver tube wall.
For bolt-on tighteners like the Andersen Rapid Hitch, the bolt threads through the side of the receiver tube and the wedge pad presses against the shank from the side. Install according to the device-specific instructions.
Step 5: Tighten The Wedge Mechanism
Turn the wedge nut or bolt clockwise to engage the wedge against the rack shank. Continue turning until firm hand resistance is reached. The Andersen Rapid Hitch tightens with a 19mm wrench or socket. The StableLoad tightens with an Allen wrench. The Yakima HitchLock uses a thumb-tightened knob.
Do not over-tighten with power tools or pliers. The wedge mechanism is designed for hand torque only. Over-tightening can deform the receiver tube or strip the wedge threads.
Step 6: Verify Side-To-Side Play
Grab the rack at the tip again and shake firmly side to side. The play should now be under 1/16 inch and there should be zero audible rattle. If you still feel measurable movement, tighten the wedge another quarter-turn and retest.
Step 7: Install The Retention Clip Or Lock Cylinder
The anti-rattle pin still requires a retention clip on the far end to prevent the pin from walking out. Install the included hairpin clip or, for premium models with locking cylinders, insert the key and turn 90 degrees to engage the lock.
The retention clip is non-negotiable. The wedge mechanism prevents lateral movement, but only the clip prevents the pin from sliding out under vibration.
Step 8: Load Test The Installation
Load one or two bikes onto the rack and re-test the side-to-side play. Some loads cause the receiver to settle slightly, requiring a quarter-turn re-tightening of the wedge mechanism. Re-tighten as needed until the loaded play stays under 1/16 inch.
Step 9: Drive At Low Speed And Re-Check
Drive at 20-30 mph for the first quarter-mile and listen for any rattle or movement. Pull over and re-check the rack tightness. Most anti-rattle devices benefit from a quarter-turn re-tightening after the first 5 miles of driving as the wedge fully seats against the shank.
Step 10: Inspect Periodically On Long Trips
On road trips over 200 miles, stop every 3-4 hours and visually inspect the rack and re-check the wedge tightness by hand. Highway vibration can occasionally loosen the wedge over very long distances, especially on rough pavement.
What this means: a complete anti-sway install takes 5-10 minutes and provides permanent stability for the life of the rack.
What Is The Best Anti-Rattle Hitch Pin For Bike Racks?
The best anti-rattle hitch pins for bike racks are the Andersen Rapid Hitch tightener ($45), the StableLoad ($25), the Yakima HitchLock ($35), and the Reese Towpower Anti-Rattle Lock ($30). All four use a wedge mechanism to eliminate receiver-tube play, and the choice depends on shank size, locking needs, and budget.
The anti-rattle device market breaks down into four major options with distinct strengths.
The Andersen Rapid Hitch tightener is the premium option for serious users. The opposing-wedge design uses two angled surfaces that drive against each other when tightened, creating uniform pressure across the full shank length.
The wedge does not loosen over time because the two surfaces lock against each other under tension. Installation is permanent: once installed, the device stays on the rack and works across multiple receivers. List price is $45 to $55 depending on shank size.
The StableLoad is the budget-conscious choice. The single-wedge design uses one threaded bolt that presses a wedge pad against the shank from the side of the receiver tube.
Installation takes 30 seconds with an Allen wrench. The downside is the wedge can loosen slightly over long highway trips, requiring periodic re-tightening. List price is $20 to $30 depending on configuration.
The Yakima HitchLock combines anti-rattle with anti-theft. The threaded knob locks the rack into the receiver and includes a key cylinder that prevents removal without the key.
The same key works on every Yakima product if you buy the SKS lock core kit. List price is $35 to $45. Best for users who park at trailheads or in urban areas where bike rack theft is a concern.
The Reese Towpower Anti-Rattle Lock is the budget locking option. The threaded pin replaces the standard hitch pin and includes a built-in lock cylinder. Anti-rattle performance is equivalent to the StableLoad. List price is $25 to $35.
For built-in solutions, the Thule AutoAttach system (T2 Pro XTR, EasyFold XT 2) and the Kuat HitchLock (NV 2.0, Sherpa 2.0) provide factory anti-rattle without needing aftermarket parts. These premium racks cost $400-$1,000 but eliminate the separate purchase.
On my own setup, I run the Andersen Rapid Hitch tightener on my wife’s Subaru Outback and the Kuat NV 2.0’s built-in HitchLock on the rack. The combination produces zero measurable play at the rack tip even with 3 bikes loaded at 70 mph.
The takeaway: Andersen for permanent installs, StableLoad for budget, Yakima HitchLock for theft protection, Reese for budget locking.
What Most Hitch Bike Rack Sway Fixes Get Wrong
After 16 years installing and stabilizing hitch-mounted cargo carriers, here are the sway fix mistakes that bother me most in typical bike rack content.
The first is the suggestion that a standard 5/8-inch hitch pin eliminates sway. The factory hitch pin only secures the rack to the receiver. It does nothing to address the receiver-to-shank tolerance gap that actually causes sway.
A factory pin with retention clip prevents pin walk-out but allows the full 1/2 to 3/4 inch of side-to-side play. The threaded anti-rattle pin or wedge bolt is the actual fix.
The second is the recommendation to “tighten the rack more firmly” or “use a bigger pin.” These do not work because the problem is dimensional, not torque-related.
The receiver tube is physically larger than the shank by 0.02 to 0.04 inches across the bore. No amount of pin tightness or pin size changes that gap. Only a wedge mechanism that fills the gap eliminates the play.
The third is the assumption that all anti-rattle devices are equivalent. The Andersen Rapid Hitch uses an opposing-wedge design that does not loosen, while the StableLoad uses a single-wedge design that requires periodic re-tightening.
The Yakima HitchLock and Reese Anti-Rattle Lock include theft protection that the Andersen and StableLoad lack. Choose based on your specific use case, not on price alone.
The fourth is the silence on receiver-tube prep. A corroded, salt-damaged, or debris-filled receiver tube prevents the anti-rattle wedge from seating properly against the shank.
A 60-second cleaning with a wire brush and WD-40 before installation drops the surface friction and lets the wedge mechanism work as designed. Skipping this step is the cause of about 20% of “the anti-rattle pin did not fix my sway” complaints.
The fifth is the missing discussion of receiver class and load. A Class II 1.25-inch receiver with 4 bikes loaded approaches its 350 lb tongue weight rating and develops flex at the frame mounting points, not just at the receiver-to-shank joint.
If your receiver is the wrong class for your load, no anti-rattle pin will fully eliminate the sway because the sway is partially coming from frame flex. The fix is upgrading to a Class III or IV receiver, not adding more anti-rattle hardware.
On a job in Lakewood last spring, a client complained that his Andersen Rapid Hitch tightener “did not work” on his 2017 Honda Pilot with a Class II receiver and a 4-bike Kuat NV 2.0 loaded with 4 mountain bikes. The actual problem was receiver class undersized for the load. A Class III receiver upgrade plus the Andersen tightener eliminated the sway completely.
The takeaway: anti-rattle devices fix shank-to-receiver play, but you also need the right receiver class and clean receiver tube for the full solution.
How Do I Know If My Hitch Receiver Is The Wrong Size?
You can tell your hitch receiver is the wrong size if the loaded rack sways more than 1 inch at the tip even after installing an anti-rattle pin, if the rear of the vehicle sags visibly with the rack loaded, or if the receiver class rating (stamped on the receiver tube) is below your loaded rack weight.
The receiver class indicators are easy to check.
The receiver class rating is stamped on the side of the receiver tube as a label or directly into the metal. The label shows the hitch class (I-V), the tongue weight rating in lbs, and the gross trailer weight rating in lbs.
Compare the tongue weight rating to your loaded rack weight. A Kuat NV 2.0 4-bike platform rack (60 lbs empty) loaded with four 35 lb bikes totals 200 lbs, which fits Class II (350 lbs) and higher.
The same rack loaded with four 65 lb e-bikes totals 320 lbs, which approaches the Class II limit and is safer on Class III. Always size up to the next class if your load is within 50 lbs of the receiver rating.
The visible vehicle sag test confirms receiver overload. With the loaded rack installed, look at the rear of the vehicle from 20 feet behind. If the rear bumper sags more than 1 inch lower than the front of the vehicle, you are exceeding the receiver tongue weight rating.
Some vehicle suspensions are softer than others and produce visible sag at lower loads. Check the loaded ride height before assuming the receiver is at fault.
The 1-inch sway test after anti-rattle installation indicates frame flex, not receiver-to-shank play. If you install an Andersen Rapid Hitch tightener correctly and still measure more than 1 inch of sway at the rack tip with bikes loaded, the receiver itself is flexing at the frame mounting points.
The fix is either reducing the load (fewer bikes, lighter bikes) or upgrading to a higher-class receiver. A Class III receiver installation runs $300-$500 turnkey at U-Haul or etrailer.
What this means: a 60-second receiver class check plus a 30-second visible sag test confirms whether your hitch is sized correctly for your bike load.
Frequently Asked Questions
Will An Anti-Rattle Hitch Pin Stop My Bike Rack From Swaying Completely?
Yes, a properly installed threaded anti-rattle hitch pin like the Andersen Rapid Hitch tightener, StableLoad, or Yakima HitchLock will reduce hitch bike rack sway from the typical 1/2 to 3/4 inch of side-to-side play down to under 1/16 inch, which is imperceptible at highway speed.
The exception is racks loaded beyond the receiver tongue weight rating, where some residual sway comes from frame flex at the receiver mounting points rather than from receiver-to-shank tolerance. In those cases, an anti-rattle pin still helps but does not fully eliminate the sway. Verify your receiver class rating is sufficient for your loaded rack weight before assuming an anti-rattle pin alone will solve the problem.
Why Does My Hitch Bike Rack Sway Even With The Pin Locked?
Your hitch bike rack sways with the pin locked because the standard 5/8-inch hitch pin only secures the rack to the receiver but does not eliminate the 0.02 to 0.04 inch tolerance gap between the rack shank and the receiver tube. The pin prevents the rack from sliding out but allows side-to-side and up-and-down play within the receiver.
The fix is a threaded anti-rattle hitch pin that replaces the standard pin and includes a wedge mechanism to fill the tolerance gap. Andersen Rapid Hitch tightener, StableLoad, and Yakima HitchLock all work on this principle. The wedge presses against the shank to lock it firmly in place, eliminating the side-to-side movement that causes visible sway.
Does The Thule AutoAttach System Eliminate Sway Without An Anti-Rattle Pin?
Yes, the Thule AutoAttach system built into the T2 Pro XTR, T2 Pro X, and EasyFold XT 2 racks eliminates sway without requiring an aftermarket anti-rattle pin. The system uses a built-in knob that drives an internal wedge mechanism against the receiver tube wall, achieving the same anti-rattle effect as the Andersen or StableLoad devices.
To activate the AutoAttach system, turn the knob clockwise by hand until it stops, typically 2-3 full rotations from finger-snug. The Thule AcuTight torque knob (on Helium Platform and Apex XT models) provides the same anti-sway function with an audible click at the engineering-specified torque. Thule is the only major bike rack brand that includes anti-rattle hardware as a standard feature.
Can I Use A Hitch Tightener With Any Hitch Bike Rack?
Yes, you can use a hitch tightener with any hitch-mounted bike rack regardless of brand. The Andersen Rapid Hitch tightener, StableLoad, and Yakima HitchLock are universal devices that work with any 2-inch shank rack (Class III/IV/V) or 1.25-inch shank rack (Class I/II) regardless of manufacturer.
The exception is Thule racks with the built-in AutoAttach system, which already include factory anti-rattle hardware. Adding an aftermarket tightener to a Thule AutoAttach rack provides redundant protection but is not necessary for most users. For Kuat, Yakima, Allen Sports, MaxxHaul, Saris, and other non-Thule racks, an aftermarket anti-rattle pin is the standard sway fix.
How Tight Should I Tighten The Anti-Rattle Pin?
Tighten the anti-rattle pin by hand until firm resistance is reached, typically 2-3 full rotations of the wedge nut or bolt from finger-snug. Do not use power tools, pliers, or pipe wrenches to over-tighten. The wedge mechanism is designed for hand torque only, and over-tightening can deform the receiver tube or strip the wedge threads.
The verification test is the rack-tip shake. After tightening, grab the rack at the tip and shake firmly side to side. Side-to-side play should measure under 1/16 inch with zero audible rattle. If you still feel measurable movement, tighten another quarter-turn. After the first 5 miles of driving, re-check the tightness because the wedge fully seats against the shank during the initial drive.
What Is The Difference Between Hitch Bike Rack Sway And Hitch Wobble?
Hitch bike rack sway refers to side-to-side movement at the rack tip caused by receiver-to-shank tolerance, typically affecting the bikes’ visual position behind the vehicle. Hitch wobble refers to general looseness in the receiver-to-shank connection that includes side-to-side, up-and-down, and rotational movement.
Both problems share the same root cause (receiver tube manufactured larger than shank) and the same fix (threaded anti-rattle hitch pin). Sway is the more visible symptom because it is amplified at the rack tip by the cantilevered weight of the bikes. Wobble is the underlying mechanical condition. Eliminating wobble with an Andersen Rapid Hitch tightener or StableLoad automatically eliminates the resulting sway.
The Bottom Line On How To Keep Hitch Bike Rack From Swaying
To keep hitch bike rack from swaying, install a threaded anti-rattle hitch pin like the Andersen Rapid Hitch tightener, StableLoad, or Yakima HitchLock. These devices fill the 1/2 to 3/4 inch tolerance gap between the rack shank and receiver tube, reducing sway to under 1/16 inch.
The receiver-to-shank tolerance gap is the root cause of sway on every hitch-mounted bike rack regardless of brand. Premium racks like the Thule T2 Pro XTR and Kuat NV 2.0 include built-in anti-rattle systems, while budget racks like the MaxxHaul 70210 require an aftermarket fix.
Verify your receiver class matches your loaded rack weight, clean the receiver tube before installation, and re-check the tightness after the first 5 miles of driving. Done right, a $25-$45 anti-rattle pin eliminates sway permanently.