Last updated: May 25, 2026
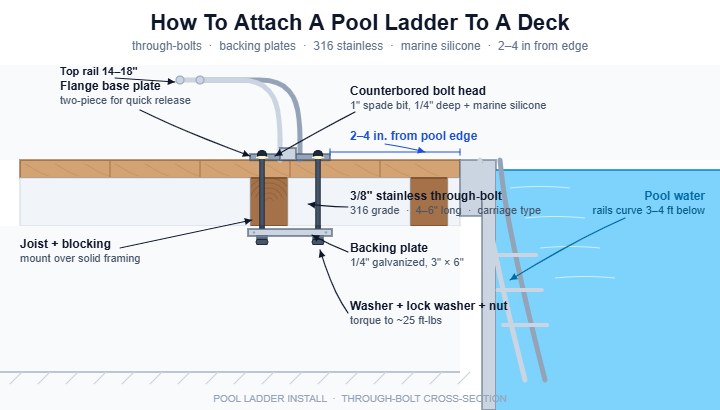
Attach a pool ladder to a deck by bolting the ladder’s flange brackets through the deck surface using four 3/8-inch stainless steel lag bolts or carriage bolts per side, with backing plates underneath the joists for reinforcement. Position the ladder so its top rail sits 14–18 inches above the deck surface and align it directly over a doubled joist for load support.
Why Does A Pool Ladder Need To Be Bolted To A Deck Instead Of Just Resting On It?
A pool ladder must be bolted to a deck because the lateral force of a swimmer climbing in and out can exceed 250 lbs of pull at the top rail, which will tip an unsecured ladder backward into the pool or forward off the deck edge.
I learned this the hard way on a job in Sarasota back in 2014. The homeowner insisted his Confer Curve deck-mount ladder would “stay put” with just the rubber feet pressed against the deck boards. Two weeks later his 11-year-old grandson rode that ladder straight into a 52-inch Intex pool when the top flange kicked outward. Nobody was hurt, but the ladder bent at the second rung and the deck board cracked.
The physics here are not optional. When a person weighing 180 lbs steps onto the top rung and shifts weight to climb down, the moment arm at the deck attachment point generates between 220 and 310 lbs of pull-out force depending on rung spacing and ladder geometry. A standard A-frame ladder with no deck attachment relies entirely on friction. Friction fails the second the rubber gets wet.
Bolting the ladder to the deck transfers that pull-out load into the deck framing instead of the surface boards. Done right, the connection is rated for several times the working load and will outlast the ladder itself.
The takeaway: pool ladder attachment is a structural connection, not a convenience. Skip the bolts and you build a personal injury claim into your backyard.
What Hardware Do I Need To Attach A Pool Ladder To A Deck?
You need four to eight stainless steel bolts (3/8-inch diameter, 4–6 inches long depending on deck thickness), matching washers and nuts, two galvanized backing plates, marine-grade silicone sealant, and a corded drill with a 3/8-inch bit and a 1-inch spade bit for counterbore recesses.
Stainless steel is non-negotiable around chlorinated or saltwater pools. I have pulled rusted galvanized lag bolts out of pool decks that snapped in half between my fingers after six summers. Use 316 stainless if you are within a mile of saltwater or running a salt chlorinator. Use 304 stainless minimum for freshwater chlorine pools. Zinc-plated steel will fail in 18 to 36 months.
The bolt length depends on the sandwich you are clamping. A typical composite deck board runs 1 inch thick, plus a 1.5-inch joist top flange, plus 1/4-inch backing plate, plus washer and nut. That puts you at a 4-inch bolt minimum. For doubled joists or pressure-treated 2×10 framing, jump to 5 or 6 inches.
Backing plates matter more than most articles admit. A 3-inch by 6-inch galvanized steel plate (1/4-inch thick) spreads the clamping force across multiple grain lines in the joist and prevents the bolt head from crushing the wood under cyclic loading. Without a backing plate, the bolt eventually pulls a cone-shaped chunk out of the joist over a couple of seasons.
Marine silicone goes around every bolt hole and under every flange. Water finds bolt holes the way ants find sugar. One uncaulked hole over an SPF joist will rot the framing in three years.
What you do not need: construction adhesive, drywall screws, deck screws, or “heavy duty” lag screws with no nut on the back. None of these create a true through-bolt connection and all of them will eventually pull out.
Bottom line: spend the extra $40 on stainless hardware and backing plates. It is cheaper than one ER copay.
Where Exactly On The Deck Should I Mount The Pool Ladder?
Mount the pool ladder so its base flanges sit directly over a doubled joist or a blocked joist bay, positioned 2 to 4 inches back from the deck edge facing the pool, with the ladder centered on the pool’s swimout area or skimmer-free zone.
The single most common installation mistake I see is mounting the ladder where it looks good instead of where the framing supports it. Most deck builders space joists 16 inches on center. A pool ladder flange is typically 6 to 9 inches wide, which means a single joist will only catch one or sometimes two of your four bolts per side.
Before you drill anything, get under the deck with a flashlight and map the joist layout. Mark the joist centers on the top of the deck with painter’s tape. If your ladder footprint does not line up with existing framing, you have two options: shift the ladder position to align with joists, or add blocking between joists to create a solid bolt target.
Blocking is straightforward. Cut a 2×8 or 2×10 to fit snugly between two joists, then secure it with joist hangers or three 3-inch structural screws toed in at each end. The blocking should sit flush with the top of the joists so the deck boards bear evenly across it.
Edge distance matters too. The leading edge of the ladder flange should sit no closer than 2 inches from the deck edge and no farther than 4 inches. Too close and you split the end grain of the deck boards under load. Too far and the ladder hangs out over the pool at an awkward angle that strains the bottom mount.
Check pool features before you commit. Do not mount over a skimmer line, return line, or pool light conduit. On above-ground pools with a top rail or coping, the ladder must clear the rail without bending the top step against it.
The takeaway: framing comes first, aesthetics second. A perfectly centered ladder over an empty joist bay is a failure waiting to happen.
How To Attach A Pool Ladder To A Deck (Step By Step)
Mark the bolt holes through the ladder flange, drill 3/8-inch through-holes, counterbore the top of each hole 1/4-inch deep with a 1-inch spade bit to recess the bolt head, apply marine silicone, insert the bolts from above, attach the backing plate from below, then tighten the nuts to roughly 25 ft-lbs.
Here is the sequence that works without fail:
Step 1: Position And Plumb The Ladder
Set the ladder exactly where it will live. Use a level to make sure the rails are plumb in both directions. Have a helper hold it steady or clamp the flanges to the deck with quick-grip clamps. Confirm the top rail height is between 14 and 18 inches above the deck surface so swimmers can grip it naturally on the climb out.
Step 2: Mark The Bolt Holes
Mark each bolt hole on the deck through the flange holes using a pencil or center punch. A center punch leaves a divot that keeps the drill bit from wandering, which matters more than people think on composite boards. Remove the ladder once all holes are marked.
Step 3: Drill The Through-Holes
Drill straight through the deck and joist with a 3/8-inch wood bit. Keep the drill perpendicular to the deck surface. A drilling guide block helps if you are not steady-handed. An angled hole misaligns the bolt with the backing plate underneath and creates uneven clamping pressure.
Step 4: Counterbore The Bolt Recesses
Counterbore the top of each hole 1/4 inch deep with a 1-inch spade bit. This recesses the bolt head so nobody catches a bare foot on it. Skip this on rough wood decks where bare feet are not in play, but always do it on composite or hardwood decking where toes will find any high point.
Step 5: Seal The Holes With Marine Silicone
Fill each counterbore and through-hole with marine silicone. Push the silicone in with the tip of the tube so it coats the full depth of the hole, not just the surface. Wipe excess off the deck surface before it skins over.
Step 6: Insert The Bolts From Above
Drop a 3/8-inch carriage bolt or hex bolt through each hole from above. Carriage bolts self-seat with their square shoulder and will not spin when you tighten from below. Tap each bolt head gently with a rubber mallet to fully seat the shoulder into the wood.
Step 7: Install Backing Plates And Nuts Underneath
From under the deck, slide the backing plate over the bolt threads. Add a flat washer, then a lock washer, then the nut. The lock washer is the part most DIYers skip, and it is also the reason their installation rattles loose by the second season.
Step 8: Torque The Connection
Tighten with a ratchet to roughly 25 ft-lbs. This is firm but not crushing. Overtightening will compress the deck board and create a divot that traps water. If you do not own a torque wrench, the rule is “snug plus a quarter turn.”
Step 9: Reattach The Ladder Flange Or Quick-Release
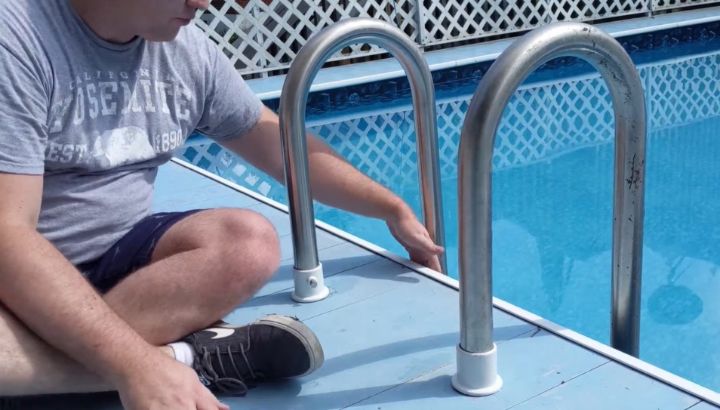
Reattach the ladder flange over the bolt heads if your ladder uses a two-piece flange system. Many Vinyl Works and Confer ladders use this design where the base plate gets bolted down first and the ladder clips into it with quick-release pins for seasonal removal.
Step 10: Load Test The Installation
Test the installation by climbing and shaking the ladder hard in all four directions. Step on the top rung and rock your weight side to side. Any movement at the deck connection means a loose bolt. Re-tighten and retest until the ladder is rock solid.
What this means: a careful 30-minute install will outlast a rushed 10-minute install by a decade.
What I Tried That Didn’t Work On My Own Backyard Pool
The first ladder I installed on my personal deck back in 2009 was a textbook example of how to do it wrong. I used 2.5-inch deck screws driven straight into the joist with no nut, no washer, and no backing plate. The ladder felt rock solid for the first month.
By the end of that first summer, the top flange had developed about a quarter inch of rotation under load. By the second summer, the screw heads had pulled up through the composite decking and left raised bumps you could feel through a towel. By the third season, two of the four screws had backed out completely.
I replaced the whole connection with through-bolts, backing plates, and 316 stainless hardware. That installation is still tight today, 16 years later, on a ladder that has been climbed thousands of times.
The lesson: screws into wood are a clamping connection that depends on the wood fibers holding the threads. Wet wood, freeze-thaw cycles, and cyclic loading all degrade that grip. Through-bolts with backing plates do not care about any of that because the load path runs metal to metal.
I see this mistake on at least one out of every four service calls. Homeowners or general handymen install pool ladders with deck screws because it is faster and looks neater from above. It is also why I get the call two or three years later when the ladder is wobbling and the deck boards are damaged.
Are Deck-Mounted Pool Ladders Code Compliant?
Deck-mounted pool ladders must comply with local pool barrier codes, the International Residential Code section on swimming pools, and typically require the ladder to be removable or lockable so unsupervised children cannot access the pool.
Most jurisdictions in the US follow some version of the ISPSC (International Swimming Pool and Spa Code) or IRC Appendix G. The core requirement: any pool over 24 inches deep needs a barrier that prevents unsupervised entry by children under 5.
A deck-mounted ladder that stays down 24/7 is part of the barrier system. That means it must either be removed when the pool is not in use, locked in an up position with a code-compliant locking mechanism, or located inside an enclosed deck area that itself functions as a barrier.
The most common compliant setups I install use flip-up A-frame ladders where the in-pool side lifts up and locks above the deck level, removable ladders that lift off the deck bolts entirely, and ladders mounted inside fenced pool decks where the fence and self-closing gate handle the barrier requirement.
State and county requirements vary significantly. Florida, Arizona, and California have some of the strictest residential pool barrier rules. Some Florida counties require a four-sided isolation fence regardless of deck configuration. Always pull the local code before you commit to a ladder location.
Insurance matters too. A homeowner’s policy can deny a drowning claim if the pool was non-compliant at the time of incident. I have seen denials on technicalities as small as a missing ladder lock pin.
The takeaway: code compliance is not optional and the deck-mount install must support whatever locking or removal method your jurisdiction requires.
What’s The Difference Between Attaching A Ladder To A Wood Deck Vs A Composite Deck?
Wood decks allow direct lag bolts into joists if necessary, while composite decks require through-bolts with backing plates because composite material lacks the fiber strength to hold a lag thread under cyclic load.
Composite decking from Trex, TimberTech, Fiberon, and Azek looks like wood but behaves like dense plastic. The capped polymer surface and PVC or wood-flour core have almost no resistance to a screw or lag bolt being pulled straight up. I have measured pull-out values on composite as low as 80 lbs per fastener compared to 400+ lbs for the same fastener in pressure-treated yellow pine.
For composite decks, through-bolts are mandatory. Period. The bolt passes completely through the deck board, through the joist, and gets clamped from below with a nut and backing plate. The composite board itself carries no fastener load, it just sits sandwiched between the ladder flange and the joist.
Wood decks give you more options. Pressure-treated southern yellow pine or Douglas fir joists will hold a 5/16-inch lag bolt at roughly 300 to 450 lbs pull-out depending on thread engagement. That is enough for many ladder installs without backing plates.
That said, I still recommend through-bolts on wood decks too. Wood splits over time, the deck moves with temperature and moisture, and lag bolts loosen as the wood checks. Through-bolts with backing plates eliminate all of that.
PVC decking is even worse than composite for fastener holding power. Treat it exactly like composite.
Special note on grooved-edge composite boards: do not mount a ladder flange across a grooved edge. The groove cuts off about 40% of the board cross-section and creates a stress riser that will crack under load. Position the ladder over a solid section of board or replace one board with a non-grooved equivalent.
Bottom line: composite always needs through-bolts and backing plates. Wood is more forgiving but benefits from the same approach.
How Do I Keep A Deck-Mounted Pool Ladder From Rusting Or Rotting The Deck?
Prevent rust and rot by using 316 stainless steel hardware for saltwater or aggressive chlorine environments, sealing every bolt hole with marine-grade silicone before bolt insertion, and inspecting the deck framing under the ladder annually for moisture intrusion.
Water intrusion is the silent killer of deck-mounted ladder installations. Every bolt hole is a direct path for pool splash water to reach the joist below. Once that joist gets wet repeatedly without drying, fungal decay starts within 18 to 36 months on untreated wood and within 3 to 5 years on pressure-treated lumber.
The seal sequence matters. Silicone goes in the hole before the bolt, not after. Applying silicone around the bolt head after installation creates a surface seal that fails within a season. Pre-filled holes seal around the bolt shank for the full depth of the deck board.
I use 3M 5200 fast-cure or Sika 291 for this. Standard bathroom silicone will not hold up. Polyurethane sealants flex with the deck movement and stay bonded to the bolt threads.
Annual inspection takes 5 minutes. Get under the deck with a flashlight and a screwdriver. Probe the joist underside around each bolt with the screwdriver tip. If it sinks more than 1/8 inch into the wood, you have decay starting. Address it immediately by removing the ladder, replacing the affected blocking or sistering the joist, and reinstalling with fresh sealant.
The hardware side is simpler. 316 stainless for any pool environment. Skip the bargain stainless from import hardware stores, which is often 18-8 or unmarked low-grade alloy that will pit in chlorinated water within a year or two.
For composite decks, also check the deck board under the ladder flange annually. Composite can develop hairline cracks around fastener holes that let water reach the framing even when the bolts themselves are sealed.
What this means: 10 minutes of inspection per year prevents a $1,200 framing repair.
Frequently Asked Questions
Can I Attach A Pool Ladder To A Floating Deck Or Ground-Level Platform?
Yes, but only if the floating deck has solid framing underneath the ladder mounting area. A floating deck built on adjustable pedestals or precast blocks needs blocking added between joists at the ladder location to create a continuous load path.
The challenge with ground-level decks is accessing the underside for backing plates. If the deck is less than 12 inches off the ground, you may need to lift a section of decking to install the backing plates and nuts, then reinstall the boards. Skip the backing plates and the ladder will eventually loosen as the bolts pull through the wood.
How Much Weight Should A Deck-Mounted Pool Ladder Hold?
A properly installed deck-mounted pool ladder should hold a working load of at least 300 lbs per ANSI/NSPI standards for residential pool equipment, with a safety factor of 4x meaning the actual failure load should exceed 1,200 lbs at the deck connection.
The ladder itself is usually the weakest link rather than the deck attachment. Most residential pool ladders from Confer, Vinyl Works, and Main Access are rated 250 to 300 lbs working load. Your deck attachment should always be stronger than the ladder so failure happens at the rung, not at the bolts, where it is more recoverable.
Do I Need A Permit To Install A Deck-Mounted Pool Ladder?
Usually no permit is required for the ladder installation itself, but the original pool and deck typically required permits, and any modification to the pool barrier system may need inspection in some jurisdictions like Florida, California, and Arizona.
Check with your local building department before drilling holes if your pool is new or recently permitted. Some inspectors consider the ladder part of the barrier system and want to verify it complies with the locking or removability requirements. A 5-minute phone call to the permit office prevents a 6-month nightmare with code enforcement.
Can I Attach A Pool Ladder To A Deck Without Drilling Holes?
Yes, but only for temporary or low-traffic installations using clamp-on deck mount brackets that grip the deck edge with adjustable thumbscrews. These work for seasonal use but are not recommended for permanent installations or for ladders used by children.
Clamp-on mounts rely entirely on friction and thumbscrew pressure to stay in place. They loosen with use, vibration, and temperature changes. I have seen clamp-mounts come loose mid-climb and they are the reason most pool ladder injury claims involve ladders that were “almost” properly attached. If the ladder will see regular use, bolt it down.
How Do I Remove A Deck-Mounted Pool Ladder For Winter?
For seasonal removal, install the ladder using a two-piece flange system where the base plate stays permanently bolted to the deck and the ladder lifts off via quick-release pins or thumbscrew connections. The Confer Curve and Vinyl Works ALC series both offer this design.
To remove the ladder, pull the pins or unscrew the connectors, lift the ladder straight up off the base plate, and store it indoors or under cover. Plug the exposed base plate bolt holes with marine silicone or removable rubber caps to keep debris and water out over winter. This setup makes spring reinstallation a 2-minute job instead of a 30-minute drilling project.
What Size Lag Bolts Or Carriage Bolts Do I Need For A Pool Ladder?
Use 3/8-inch diameter stainless steel carriage bolts or hex bolts, 4 to 6 inches long depending on your deck assembly thickness. Measure the combined thickness of deck board, joist top, backing plate, washer, and nut, then add 1/4 inch of thread engagement past the nut.
For a typical 1-inch composite deck board over a 2×8 joist with a 1/4-inch backing plate, a 4-inch carriage bolt is correct. For doubled joists or thicker framing, step up to 5 or 6 inches. Avoid bolts longer than needed, since excess thread under the deck is just a snag point for pool toys and hands.
The Bottom Line On Attaching A Pool Ladder To A Deck
A pool ladder attached to a deck is a structural connection that protects your family from a serious injury risk. The right way to do it is not complicated, but every step matters.
Use 316 or 304 stainless steel through-bolts. Add backing plates under the joists. Seal every hole with marine-grade silicone before bolt insertion. Mount the ladder directly over solid framing, not over empty joist bays. Counterbore the bolt heads on composite decking. Verify your installation meets local pool barrier code, which usually means the ladder must be removable or lockable.
The hardware costs roughly $35 to $60 for a complete installation. The labor is 30 to 45 minutes if you have the tools on hand and access under the deck. Compared to the cost of a single emergency room visit, or a denied insurance claim, that investment is trivial.
Skip the deck screws and the construction adhesive. Skip the bargain hardware from the import bin. Skip the “it looks fine” mounting position that ignores the joist layout. Every pool ladder failure I have seen in 17 years of installations traced back to one of those three shortcuts.
Do it once, do it right, and the connection will outlast the ladder, the deck boards, and probably the pool itself. That is how you attach a pool ladder to a deck.